

Have you ever wanted to sketch a delicious-looking strawberry? Maybe you thought it looked a bit tricky to get just right. Well, good news! If you’ve wanted to learn how to draw a strawberry, you’re definitely in the right place. This guide, you see, is here to show you everything you need to know to draw this tasty fruit, and it’s actually simpler than you might think.
Drawing fruit, you know, is something we really enjoy around here. There's just something so satisfying about bringing a simple, natural shape to life on paper. And a strawberry, with its bright color and little seeds, is a pretty charming subject for any artist, whether you're just starting out or have been sketching for a while. This tutorial, in a way, is designed to help anyone who picks up a pencil.
Fear not—this tutorial will provide you with a comprehensive guide on how to draw a strawberry. We're going to break it down into easy, manageable steps, so you can create a beautiful, lifelike strawberry drawing. Or, if you prefer, you can even draw a cute strawberry with a funny face! It's all about having fun with your art, so that's what we'll focus on today.
Table of Contents
- Getting Ready: What You'll Need
- Step 1: The Basic Strawberry Shape
- Step 2: Adding the Green Leaves
- Step 3: Making the Little Seeds
- Step 4: Giving It Life with Outlines
- Step 5: Bringing It to Life with Color
- Step 6: Your Personal Touch (Maybe a Funny Face!)
- Frequently Asked Questions About Drawing Strawberries
- Wrapping Up Your Strawberry Drawing Adventure
Getting Ready: What You'll Need
Before we get started, it's a good idea to gather your art supplies. You don't need anything fancy, really, just some basic items. We love drawing fruit, and for this project, you'll want a pencil, an eraser, and some paper. If you want to add color, you could use colored pencils, crayons, or markers. We often share our favorite art supplies (you can find links to art supplies we love on our site, like your favorite brand of colored pencils, if you want to explore more options). Just grab what you have handy; that's the main thing.
This whole process, you know, is designed for beginners. So, if you're just picking up a pencil for the first time, don't worry. We’ll help you every step of the way. It’s about enjoying the process, and not worrying too much about perfection. You might find that a simple sketch pad works just as well as anything else, honestly.
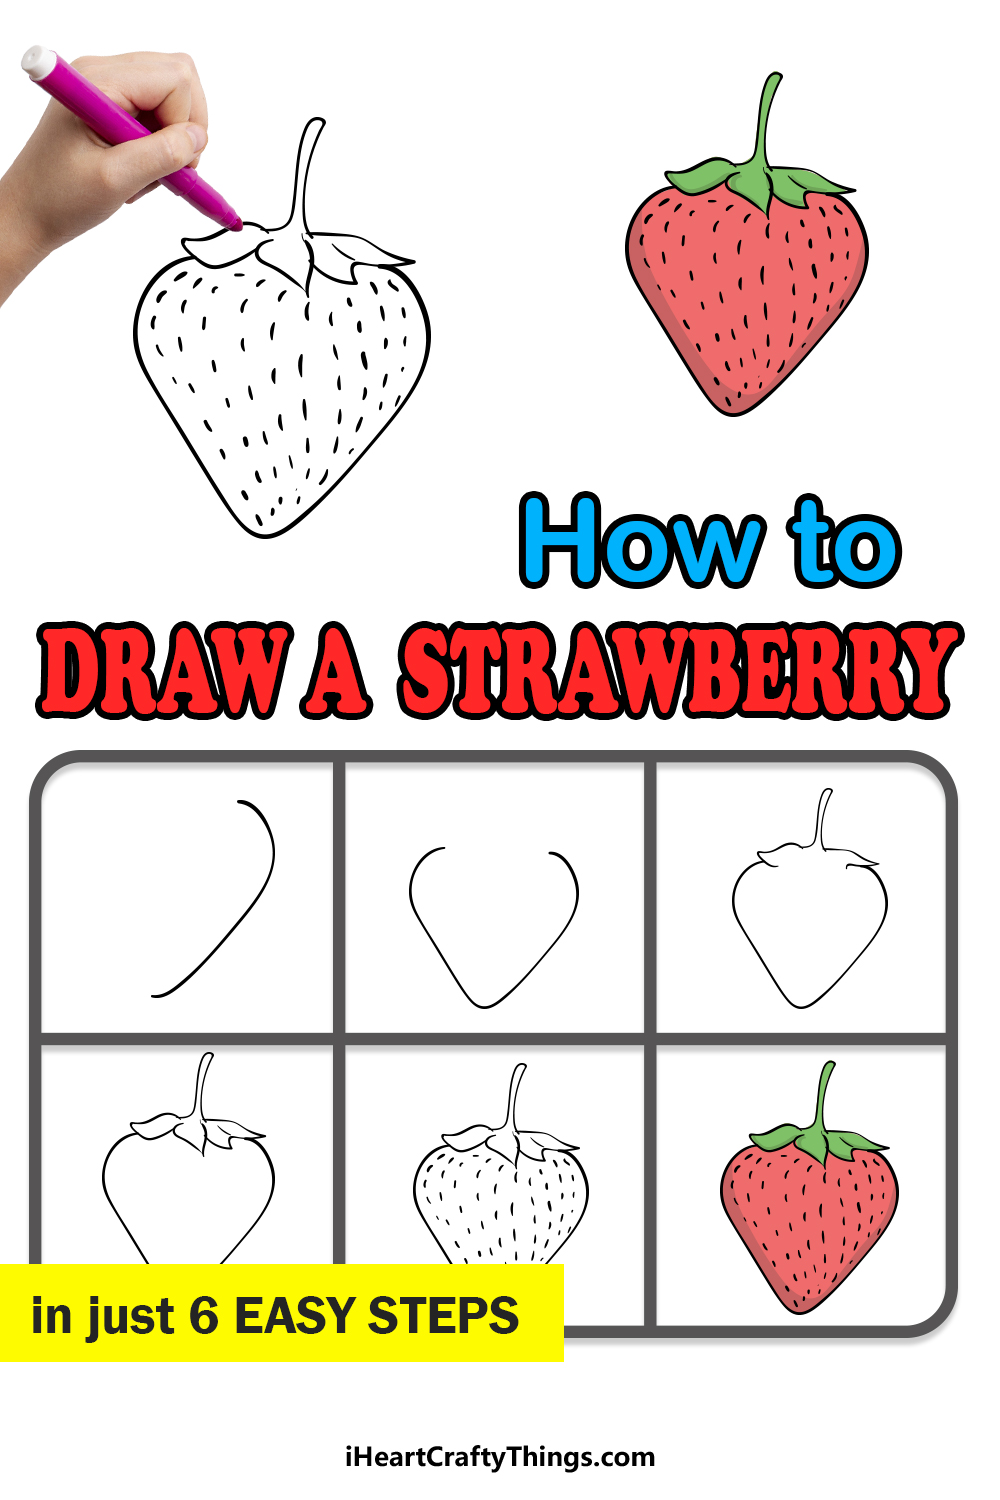
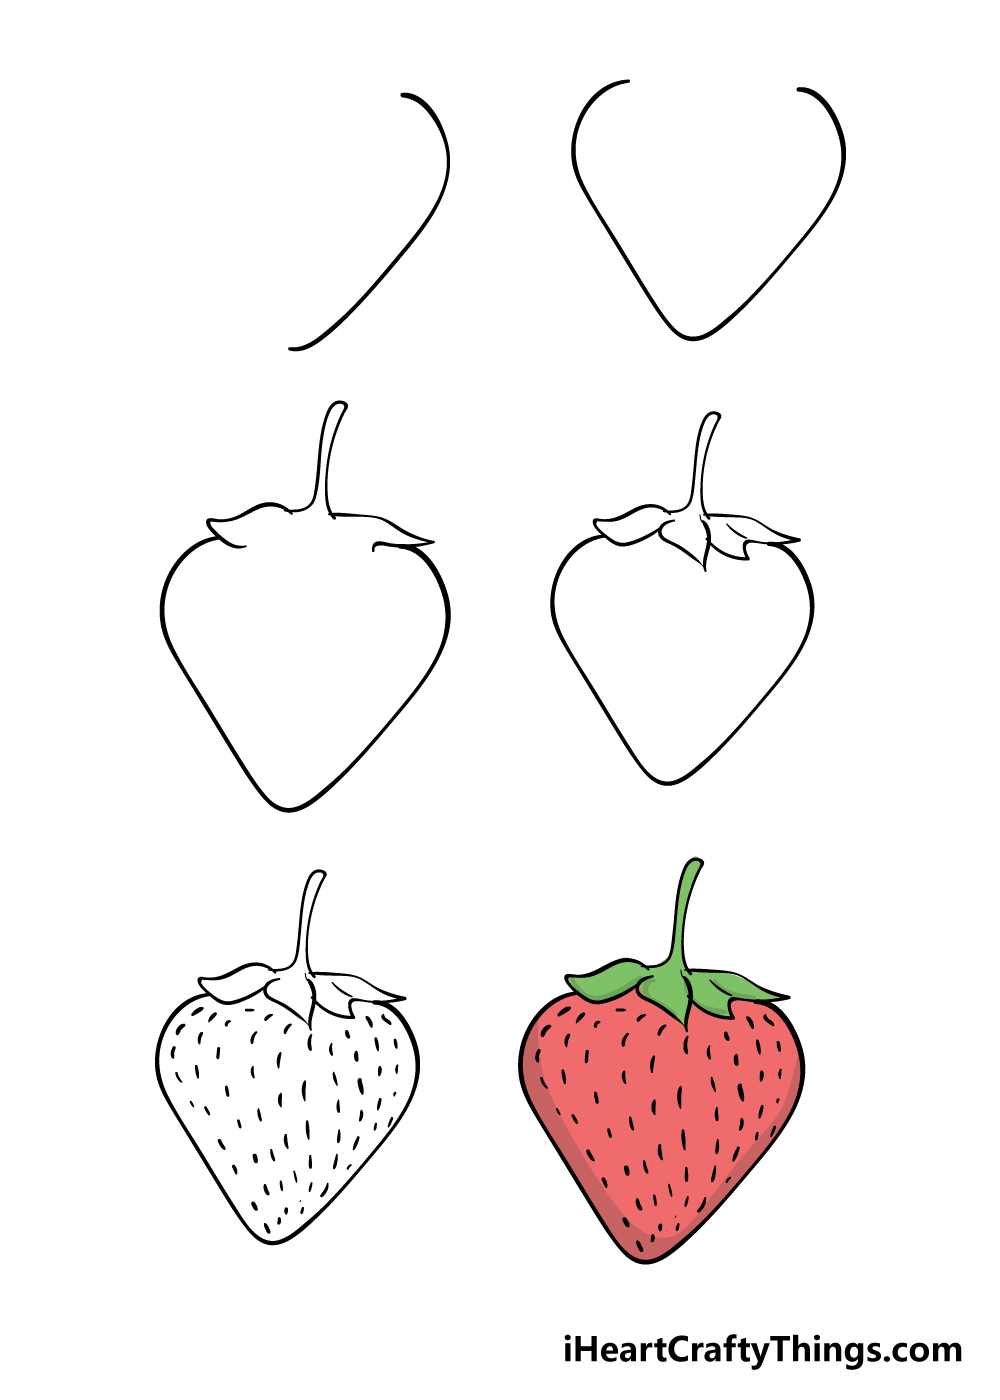
Step 1: The Basic Strawberry Shape
To begin drawing your strawberry, we'll start with its main body. Think of a slightly rounded triangle or, maybe, a heart shape that's a bit squished at the bottom. It's not a perfect circle or a perfect triangle, but somewhere in between, you know? Draw a gentle curve for the top, then bring the sides down to a somewhat pointed base. This is the foundation for your tasty fruit, and it's pretty much the most important part to get right at first.
You can make it a little plump or a bit slimmer, depending on how you imagine your strawberry. This initial outline, you see, doesn't need to be perfect. It's just a guide, really. We're just trying to capture the general feel of a strawberry, so just sketch lightly. If you make a mistake, that's what erasers are for, right?
Step 2: Adding the Green Leaves
Next, we'll add the green cap and stem at the top of your strawberry. This part, you know, really makes it look like a strawberry. Draw a few jagged, leaf-like shapes coming out from the top center of your main strawberry body. These are called the calyx, and they often have a slightly star-like appearance.
You can draw anywhere from three to five of these little leaf shapes. Some might overlap a bit, and that's perfectly fine. Then, from the very center of these leaves, draw a short, thin stem reaching upwards. This stem, it's almost, what you'd hold onto if you were picking the strawberry. It's pretty simple, actually.
Step 3: Making the Little Seeds
Now comes one of the most recognizable features of a strawberry: its tiny seeds. These aren't just dots; they're actually little indentations on the fruit's surface. So, you want to draw small, elongated teardrop or oval shapes scattered across the body of your strawberry. Don't make them too big, just little marks, you know?
Try to place them somewhat randomly, but also follow the curve of the strawberry's shape. You don't need to draw hundreds of them; just enough to give the impression of a seeded surface. You can draw this strawberry by following this drawing lesson, and paying attention to these small details really helps. It adds texture and makes it look more real, that's for sure.
Step 4: Giving It Life with Outlines
Once you're happy with your initial sketches, it's time to refine your lines. Go over your pencil lines with a slightly darker touch, or even a fine-tip marker, if you're feeling brave. This helps to make your strawberry drawing stand out. You can erase any stray pencil marks or guidelines you made in the earlier steps now, too.
This tutorial shows how to draw a beautiful strawberry in six simple steps with easy to follow examples for each of them, and this outlining part is where your drawing really starts to take its final form. Make sure your lines are smooth and confident. You want to give it a clean look, pretty much, before you add any color.
Step 5: Bringing It to Life with Color
This is where your strawberry truly comes alive! Most strawberries are a vibrant red, so grab your red colored pencil, crayon, or marker. Fill in the main body of the strawberry with this color. You can use different shades of red to add some depth, maybe a bit darker near the bottom or where shadows might be, you know?
Then, color the leaves and stem a nice green. Again, you could use a lighter green for some parts and a darker green for others to give it more dimension. This tutorial shows a simple way to draw and color a strawberry, and adding these colors is, in fact, incredibly satisfying. By following the simple steps, you too can easily draw a perfect strawberry that looks good enough to eat.
Step 6: Your Personal Touch (Maybe a Funny Face!)
Now that you have a beautifully drawn and colored strawberry, you can add your own unique flair! Remember how we talked about drawing a cute strawberry with a funny face? This is the perfect moment for that. You could add two simple dots for eyes and a little curved line for a smile. Or maybe a surprised expression, you know?
You could also add a little shine to your strawberry by leaving a small white spot on its surface, as if light is reflecting off it. This little trick, honestly, makes it look extra juicy. Whether you are a beginner or an experienced artist, you will find helpful tips and techniques throughout this guide to make your strawberry truly yours. It's all about having fun with it, basically.
Frequently Asked Questions About Drawing Strawberries
People often have a few questions when they start drawing strawberries. Here are some common ones:
How can I make my strawberry drawing look more realistic?
To make your strawberry look more real, you might try adding subtle shading. Think about where light would hit the strawberry and where shadows would fall. Use slightly darker reds or even a touch of brown in the shadowed areas, and leave lighter spots where the light shines. Also, make sure your seeds follow the curve of the fruit, that's pretty important.
What if my strawberry doesn't look perfect?
That's totally fine, actually! Drawing is about practice and having fun. No two real strawberries look exactly alike, so why should your drawings? Every line you draw, every shape you make, helps you get better. Just keep practicing, and you'll see improvement. It's more about the enjoyment of creating, you know, than making something absolutely flawless.
Can I draw other fruits using these steps?
You absolutely can! Many fruits share similar basic shapes or principles. For example, drawing an apple might start with a circle, and then you add a stem and leaf, much like the strawberry's cap. You can take what you learned here and apply it to other fruits, too. It's a great way to keep practicing your drawing skills, in a way.
Wrapping Up Your Strawberry Drawing Adventure
So, you've just learned how to draw a great looking strawberry with easy drawing instructions and, perhaps, even a video tutorial if you checked out some of the resources. We covered the basic elements of how to draw a strawberry, from its initial shape to adding those tiny seeds and vibrant color. This tutorial, you know, was fairly easy and provided clear steps.
You can create a beautiful, lifelike strawberry drawing by following these ways. It’s truly great for beginners, kids, and anyone looking for simple and fun drawing ideas! Remember, the guide in front of you showed everything you needed to know to draw this tasty fruit. If you want a handy reference, you can follow this simple guide and get a free PDF to print out at www.colomio.com. You can also learn more about drawing basics on our site, and perhaps even link to this page for more fruit drawing ideas.

Detail Author:
- Name : Armani Murazik III
- Username : leslie87
- Email : nlueilwitz@yahoo.com
- Birthdate : 2004-07-26
- Address : 3389 Schroeder Lakes Suite 108 Lake Jordane, OH 85899-8600
- Phone : 1-352-928-0297
- Company : Rogahn-Lynch
- Job : Marking Machine Operator
- Bio : Repudiandae sapiente in suscipit totam ut quod dolores. Consequatur architecto est sed accusamus odit. Accusantium voluptate iusto sit et.
Socials
linkedin:
- url : https://linkedin.com/in/vladimirstreich
- username : vladimirstreich
- bio : Qui delectus odio et dolores vero ut.
- followers : 5632
- following : 611
twitter:
- url : https://twitter.com/vstreich
- username : vstreich
- bio : Omnis laboriosam commodi est possimus. Voluptate et autem dicta odit maiores cum rem. Eum laudantium earum laborum. Saepe eum dolorem totam quas.
- followers : 2918
- following : 1274
instagram:
- url : https://instagram.com/vladimir_streich
- username : vladimir_streich
- bio : Saepe quo vitae voluptatem. Eius est non et occaecati. Qui totam est adipisci repellendus.
- followers : 1828
- following : 2866


 Bonus
Bonus