

Are you feeling a bit like you want to create something wonderful with a pencil, but maybe drawing eyes seems a little too hard? It's almost like trying to bake a fancy cake without a recipe, isn't it? Well, you know, just like you don't have to be a professional baker to make a truly delicious treat, you certainly don't have to be an art expert to draw an eye that looks quite good. This guide is here to show you a very straightforward path, a kind of simple recipe, if you will, for making eyes appear on your paper.
For many people, the thought of drawing a human eye can feel a bit overwhelming, what with all the tiny details and the way light plays across the surface. You might worry about making it look flat or, you know, not quite alive. But, honestly, it's not as tricky as it might seem at first glance. We're going to break it down into small, manageable steps, so you can just focus on one thing at a time, making the whole process much more enjoyable.
This article, actually, is going to walk you through a clear and simple way to draw an eye that has a lot of life to it. We'll go over the basic shapes, talk about how to add some darkness and lightness to make it pop, and even touch on common eye forms. By the time you're done reading, you'll have a much better idea of how to put an eye on paper, and you might just surprise yourself with what you can create. It's really about taking things one small piece at a time.
Table of Contents
- Getting Started with Your Easy Eye Drawing Journey
- The Step-by-Step Guide to Easy Eye Drawing
- Step 1: Laying Down the Basic Shape
- Step 2: Outlining the Iris and Pupil
- Step 3: Adding the Eyelids and Creases
- Step 4: Shaping the Tear Duct and Inner Corner
- Step 5: Beginning the Shading – The Whites of the Eye
- Step 6: Shading the Iris for Depth
- Step 7: Bringing the Pupil to Life
- Step 8: Detailing the Eyelashes
- Step 9: Refining Your Realistic Eye
- Tips for Making Your Easy Eye Drawing Look More Realistic
- Frequently Asked Questions About Easy Eye Drawing
Getting Started with Your Easy Eye Drawing Journey
Before you even put pencil to paper, there are a few simple things that can make your easy eye drawing experience much smoother. It's kind of like getting all your ingredients ready before you start cooking; it just makes everything flow better. You want to set yourself up for success, and these first few steps are pretty helpful for that, actually.
Gathering Your Simple Tools
You don't need a whole art studio to begin. For this easy eye drawing process, you just need a few basic items, you know? A good pencil, some paper, and an eraser are really all you need to get going. For drawing the first simple shapes, a pencil that is a bit softer, like an HB, works well. Then, for making things darker, you might want a 4B pencil, and for adding very fine lines or small details, a 2B can be quite useful. These different pencils just help you get different levels of darkness and sharpness in your lines, which is pretty neat.
So, to recap, you'll want a drawing pencil set, or at least a few pencils with different softness levels. A simple eraser, maybe a kneaded one if you have it, will also be helpful for making corrections or lifting color. And, of course, some plain drawing paper. That's really it for your tool kit, which makes starting your easy eye drawing project pretty straightforward, doesn't it?
A Quick Look at Eye Shapes
When you're learning how to draw an eye, it helps to know that eyes come in many different forms. Some eyes are, say, more almond-shaped, while others might be rounder. Some people have eyes that turn up at the corners, and others might have eyes that turn down a bit. There's no single "right" eye shape, which is a good thing! The goal with easy eye drawing is not to make every eye look the same, but to capture the general form you're aiming for. So, just keep in mind that variety is a natural part of what makes eyes so interesting to draw, you know?
You don't need to memorize every single eye shape out there, but just being aware that they are all a little bit different can help you make your drawings feel more alive. For instance, if you're drawing a female eye, you might notice certain characteristics that tend to be more common. It's all about observation, really, and not about trying to make every eye conform to one strict idea. This makes your easy eye drawing journey a bit more freeing, I think.
Observing Your Own Eyes
Here's a really simple, yet very helpful, tip for your easy eye drawing practice: take a moment to look at your own eyes in a mirror. Seriously, just spend a minute or two really looking. Notice how the eyelid sits over the eyeball, how the corner near your nose is shaped, and how the lashes grow. You'll see how the light catches the surface of your eye, and how the pupil, that dark center part, is truly round. This kind of direct looking, you know, helps you understand the real structure of an eye, which is super valuable.
When you examine your own eyes, think about the various elements that make them up. Where does the light reflect? How does the skin around the eye wrinkle or fold? These little observations, honestly, will give you a much better feel for what you're trying to put on paper. It's a bit like studying a recipe's ingredients before you start mixing them; it just gives you a clearer picture of the end result. This personal observation is a powerful tool for your easy eye drawing endeavors.
The Step-by-Step Guide to Easy Eye Drawing
Alright, so now we're getting to the main part, the actual drawing steps for your easy eye drawing project. This tutorial is designed to be super simple, breaking down the process into clear, manageable parts. You'll find that by taking it one step at a time, the whole thing becomes much less intimidating. We're going to build this eye piece by piece, you know, just like you'd build anything else.
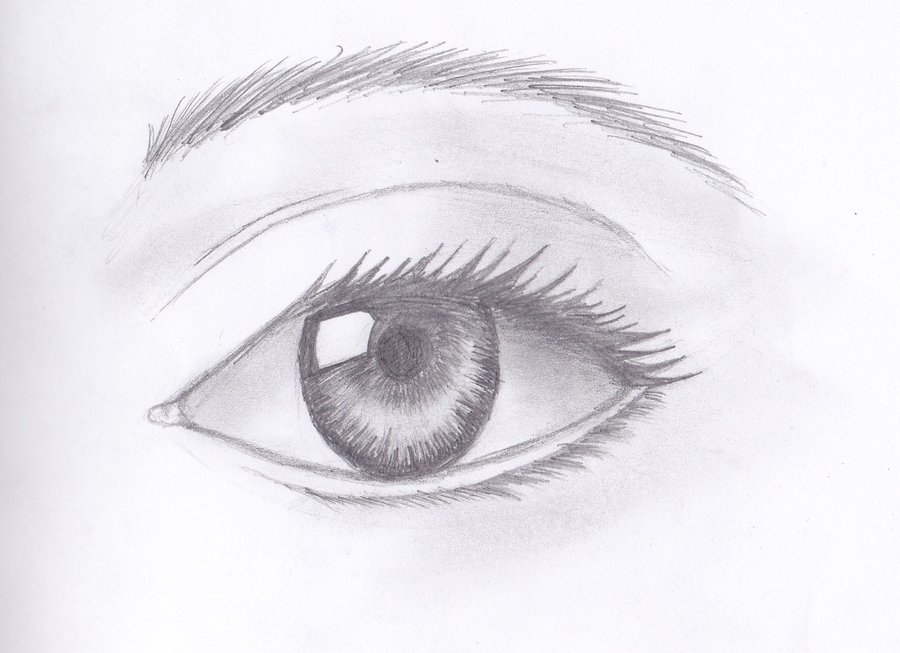
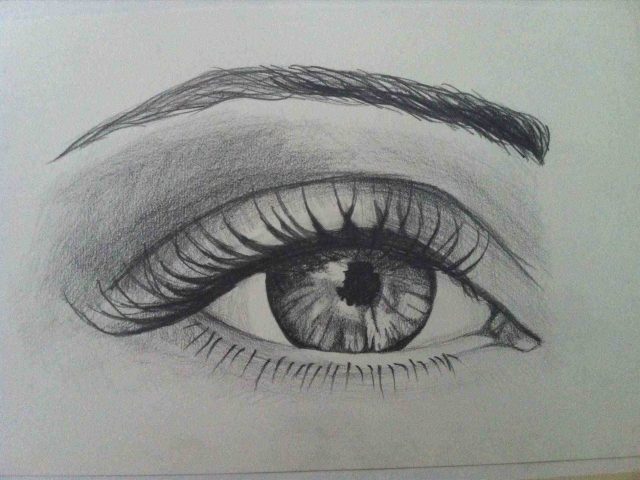
Step 1: Laying Down the Basic Shape
To begin your easy eye drawing, you'll want to sketch the overall outline of the eye. Think of it like drawing a kind of almond shape, but with a slight curve on the top and bottom. Use a soft pencil, like an HB, and make your lines very light. These are just guide lines, so you don't want them to be too dark. You're basically creating the space where the eye will sit. This initial shape is really important for getting the proportions right, so take your time with it, you know?
This step is all about getting the general size and tilt of the eye correct. It's like drawing the basic framework of a house before you add any walls. Don't press too hard, because you might want to adjust it a little bit later. This foundation is what everything else will build upon, making your easy eye drawing much more manageable as you go along.
Step 2: Outlining the Iris and Pupil
Next up in your easy eye drawing, you need to draw the outline of the iris and the pupil. The iris is the colored part of the eye, and the pupil is that dark circle right in the middle. Remember, the iris is a circle, but you usually only see part of it because the eyelids cover the top and bottom edges. So, draw a circle that is mostly visible, but maybe a little bit hidden by the top and bottom lines you just drew. Then, inside that, draw a smaller, perfectly round circle for the pupil.
Make sure the pupil is right in the center of the iris. This step, you know, really starts to give your eye some character. The size and placement of these circles are pretty important for making the eye look natural. Take a minute to make sure they feel right to you, as this is a key part of making your easy eye drawing come alive.
Step 3: Adding the Eyelids and Creases
Now, let's add the eyelids. For your easy eye drawing, draw a line above the top eyelid to show the crease where the eyelid folds. This line usually follows the curve of the top eyelid. You'll also want to add a subtle line below the bottom eyelid to give it a bit more definition. These lines help to show the thickness of the eyelid itself, which is something people often forget, you know?
These creases and lines are pretty important for making the eye look like it's part of a face, rather than just a flat shape. They give the eye form and depth. Don't make these lines too dark; they should be softer than the main outline of the eye. This step really helps to integrate the eye into the surrounding skin, making your easy eye drawing more believable.
Step 4: Shaping the Tear Duct and Inner Corner
At the inner corner of the eye, near the nose, there's a small, fleshy part called the tear duct. For your easy eye drawing, draw a small, rounded shape here. It's not just a sharp point, but a little bump. This small detail is actually quite important for making the eye look complete and natural. It's one of those little things that, you know, really adds to the realism.
Also, consider the skin around this area. It might have a slight fold or curve. Paying attention to this small part of your easy eye drawing can make a big difference in the overall look. It helps to connect the eye to the rest of the face in a very natural way.
Step 5: Beginning the Shading – The Whites of the Eye
Even the "whites" of the eye aren't truly white. For your easy eye drawing, you'll want to add some very light shading to them. Think about where the light is coming from. The top part of the white, under the upper eyelid, will usually be a little bit darker because the eyelid casts a small shadow. Also, the corners might be slightly darker. Use a very light touch with your pencil, perhaps your HB, to add these subtle shades.
This step helps to give the eyeball a round shape, making it look like a sphere rather than a flat circle. It's a small detail, but it's pretty effective for creating depth in your easy eye drawing. Remember, light and shadow are what make things look three-dimensional, so even these subtle shades are important.
Step 6: Shading the Iris for Depth
Now we get to shading the iris, the colored part of the eye. This is where you can really make your easy eye drawing pop. The iris has many lines and patterns that radiate out from the pupil. Start by shading the top part of the iris darker, again because of the shadow from the upper eyelid. Use your 4B pencil for this, making the area near the pupil darker as well.
You can also add some very light lines that go from the pupil outwards, like spokes on a wheel. Don't make them too strong, just enough to suggest texture. The iris isn't just a flat color; it has a lot of interesting variations. This shading really brings life to your easy eye drawing, giving it a sense of depth and realism, you know?
Step 7: Bringing the Pupil to Life
The pupil is the darkest part of the eye. For your easy eye drawing, fill the pupil in completely with your darkest pencil, like the 4B. Make it a very solid, deep black. However, here's a crucial part: leave a small, bright white spot or two for the highlight. This highlight is the reflection of light on the surface of the eye, and it's what makes the eye look wet and alive.
The placement and shape of this highlight are very important. It should look like a little window to the light source. This small detail, honestly, is what gives your easy eye drawing that spark of life. Without it, the eye can look a bit dull, so take care with this step, you know?
Step 8: Detailing the Eyelashes
Eyelashes can really frame the eye. For your easy eye drawing, draw them curving outwards, not just straight lines. The top lashes tend to be longer and curve upwards, while the bottom lashes are usually shorter and curve downwards. They also grow in clumps, not as perfectly spaced individual hairs, so keep that in mind.
Start your lash lines from the eyelid itself, making them thicker at the base and tapering to a point. Don't draw too many; a few well-placed lashes look much better than a dense forest. This step really adds to the overall expression of your easy eye drawing, giving it a finished look, you know?
Step 9: Refining Your Realistic Eye
This is the final step in your easy eye drawing process. Look at your drawing and see if there are any areas that need a little more work. Maybe some shadows need to be darker, or some highlights need to be brighter. Use your 2B pencil for very fine details, like tiny lines in the iris or individual hairs in the eyebrow (if you're adding them). You can also use your eraser to lift out some light areas or clean up any smudges.
This refining stage is where you truly make the eye look realistic. It's about stepping back, observing, and making small adjustments. It’s like putting the finishing touches on a delicious meal. This thoughtful review helps you bring your easy eye drawing to its best possible state, making it look truly impressive.
Tips for Making Your Easy Eye Drawing Look More Realistic
Beyond the steps, there are a few general ideas that can really help your easy eye drawing go from good to great. These are principles that many artists use, and they're pretty simple to understand, too. They just add that extra layer of believability to your work, you know?
Understanding Light and Shadow
The way light hits an object and creates shadows is really what makes things look solid and real. For your easy eye drawing, always think about where the light source is coming from. Is it from the top? The side? This will tell you where the darkest shadows should be and where the brightest highlights should appear. The areas that are furthest from the light source will be darker, and the parts directly facing the light will be brightest.
This concept of light and shadow, often called shading techniques, is truly powerful. It turns a flat drawing into something that seems to have depth and form. Even in an easy eye drawing, paying attention to these light and dark areas will make a huge difference in how realistic your eye appears, so, you know, really try to observe this.
Pencil Power: Using Different Grades
We talked about using different pencils earlier, and it's worth mentioning again how useful they are for easy eye drawing. An HB pencil is great for basic shapes and light lines. When you want to add darker shades, like in the pupil or the deep parts of the iris, a 4B pencil is your friend. And for those very fine details, like the tiny lines in the iris or individual eyelashes, a 2B pencil can give you that precision. Using these different tools lets you create a wide range of tones, from very light to very dark, which is pretty essential for realism.
Having a variety of pencil grades in your drawing kit just gives you more control over the finished look of your easy eye drawing. It's like having different brushes for painting; each one has a specific job. Experiment with them to see what they can do, and you'll find your drawings gain a lot of character.
Practice Makes Progress
The most important tip for easy eye drawing, or any drawing really, is to keep practicing. You won't draw a perfect eye on your first try, and that's perfectly okay! Every time you draw, you learn something new. Your hand gets steadier, your eye gets better at seeing details, and your understanding of shapes and shadows grows. It's a continuous journey of learning and improvement, you know?
So, don't get discouraged if your first few attempts aren't exactly what you hoped for. Just keep at it. The more you draw, the better you'll become. Each easy eye drawing you complete is a step forward in your artistic journey. You can learn more about drawing techniques on our site, and perhaps link to this page for more inspiration. Remember, consistent effort is what truly leads to progress in any skill, including drawing.
Frequently Asked Questions About Easy Eye Drawing
Here are some common questions people have when they're learning how to draw eyes, you know, just to help clear things up a bit.
How do you draw a simple eye step by step?
To draw a simple eye, you start with a basic almond shape, then add the iris and pupil as circles within that shape. After that, you put in the eyelids and tear duct. The key is to then add light shading to the whites of the eye and the iris, making sure to include a bright highlight in the pupil. Finally, you add the eyelashes. This step-by-step approach, as we've covered, really breaks it down into manageable pieces.
What is the easiest way to draw an eye?
The easiest way to draw an eye, arguably, is to focus on the fundamental shapes first: the outer eye shape, then the iris, then the pupil. Don't get caught up in tiny details too early. Once those basic forms are in place, you can gradually add shading and small features. Using simple pencils and focusing on one part at a time makes the whole process much less daunting, you know? It's all about keeping it simple.
How do you shade eyes for a realistic drawing?
Shading eyes for a realistic look involves understanding where light hits and where shadows fall. The upper eyelid typically casts a shadow on the top part of the eyeball and iris, making those areas darker. The pupil should be the darkest spot, but remember to leave a bright, sharp highlight. You can also add very subtle variations in tone within the iris itself, like little lines radiating out. Using different pencil grades (like HB, 2B, 4B) helps you get a good range of darks and lights, which is pretty important for making it look real. For more in-depth information on shading, you might find this resource on shading techniques helpful, it's a good place to learn.
This guide was last updated on September 2, 2024, to make sure you have the most current and simple advice for your easy eye drawing adventures.

Detail Author:
- Name : Benton Gerlach
- Username : adavis
- Email : nwolf@yahoo.com
- Birthdate : 1971-02-22
- Address : 283 Huel Passage Wehnerton, NH 16677
- Phone : 248.537.8525
- Company : Mohr, Murphy and Legros
- Job : Talent Director
- Bio : Quia ex nulla dolores repudiandae. Maiores quod eos non et enim eius ipsa hic. Et cum temporibus doloribus eos illo explicabo nobis adipisci. Autem doloremque eum quod est nobis.
Socials
twitter:
- url : https://twitter.com/anastasiavandervort
- username : anastasiavandervort
- bio : Tenetur sunt facilis nihil quibusdam tempora aut velit. Error rerum sit sit praesentium placeat quis adipisci. Odio eaque aut dolor facilis.
- followers : 5134
- following : 1159
linkedin:
- url : https://linkedin.com/in/anastasia_vandervort
- username : anastasia_vandervort
- bio : Id qui fugit qui magnam officia officiis.
- followers : 2109
- following : 334
instagram:
- url : https://instagram.com/anastasiavandervort
- username : anastasiavandervort
- bio : Rem nam iusto dolores aperiam voluptatem tempore sit. Odit totam ut voluptatem odit architecto.
- followers : 6398
- following : 898
facebook:
- url : https://facebook.com/anastasiavandervort
- username : anastasiavandervort
- bio : Expedita eligendi delectus consequatur porro ipsa magni impedit cupiditate.
- followers : 407
- following : 69


 Bonus
Bonus