

Learning how to tie a bow can really change things up for your gifts, clothes, or even your hair. A nicely tied bow, you see, just adds a special touch, making whatever it is look much more put together and thoughtful. It's that little bit of extra care that people often notice and appreciate, so it's a very useful skill to have.
You might think making a really good bow is a bit tricky, but it’s actually quite simple once you get the hang of it. From pretty ribbons on a birthday present to a neat finish on a dress, knowing how to tie a bow opens up so many creative possibilities. It’s a very versatile trick, after all.
This guide will walk you through the steps to create beautiful bows, including how to tie a bow that won't twist around on itself, which is a common problem. We'll share some simple steps and helpful tips, so you can make a perfect bow for just about any use. It's almost like magic, really, what a good bow can do.
Table of Contents
- Why a Well-Tied Bow Makes a Difference
- Getting Ready: What You Need
- The Classic Bow: Step-by-Step
- The "Perfect" Bow: Avoiding Twists
- Beyond the Basics: Different Bow Styles
- Tips for a Great Bow
- Common Questions About Tying Bows
Why a Well-Tied Bow Makes a Difference
A well-tied bow, you know, just shows you put thought into something. It’s not just about fastening or closing something, as the meaning of "tie" suggests; it's about adding beauty and a finished look. Think about a gift; a handmade bow can make it feel so much more personal than a store-bought sticky one. This year, consider making your own reusable bows with ribbon instead of those disposable ones, which is a really nice touch.
These simple bows can be made using thin or thick ribbon, and they’re really the perfect finishing touch for nearly anything. Whether you’re decorating clothing, a package, or some other application, anyone can tie a perfect bow. It’s actually so easy, even if it might seem a bit intimidating at first. So, that’s why it’s worth learning.
Getting Ready: What You Need
Before you start, you'll need just a few things. The most important, obviously, is your ribbon. You can use fabric ribbon, paper ribbon, or even yarn, depending on what you're decorating. The width of your ribbon can change the look of your bow quite a lot, so keep that in mind.
You might also want a pair of sharp scissors for cutting the ends of your bow neatly. Sometimes, a flat surface helps, but you can also practice tying knots in front of a mirror for best results, just like you would for a necktie. This helps you see what you’re doing from the right perspective, you know.
The Classic Bow: Step-by-Step
This is probably the most common way people learn how to tie a bow. It’s a very simple method, and once you get it down, you can use it for so many things. We'll show you, step by step, how to make a beautiful bow that can be used for gifts, hair, or just about anything. It’s pretty straightforward, really.
Making the First Loop
First, take your ribbon and make a loop with one end. Hold this loop between your thumb and forefinger. This will be one "ear" of your bow. Make sure it's a comfortable size for the bow you want to create. This is your starting point, after all.
The length of the tail hanging down from this first loop will determine how long one of your bow's "tails" will be. You want to make sure it's long enough to trim nicely later. So, give yourself a little extra, perhaps.
Crossing and Pulling Through
Now, take the other end of the ribbon and bring it over the top of the first loop. Then, bring it around and thread it through the hole you’ve created in the center. This is very similar to how you start tying your shoelaces, you know. It’s a familiar motion for many.
As you pull it through, you'll start to form a second loop. This second loop will be the other "ear" of your bow. Try to keep both loops roughly the same size as you pull. It helps with the overall look, you see.
Tightening and Shaping
Once you have both loops, gently pull them tight. You want the knot in the middle to be snug but not so tight that it crushes the ribbon. Now, you can adjust the loops and the tails to make your bow look just right. This is where you really shape it. It's quite satisfying, honestly.
Fluff out the loops a bit, and make sure they are even. You can slide the tails around to get them positioned correctly too. This part is all about personal preference and making it look pretty. Take your time with it, naturally.
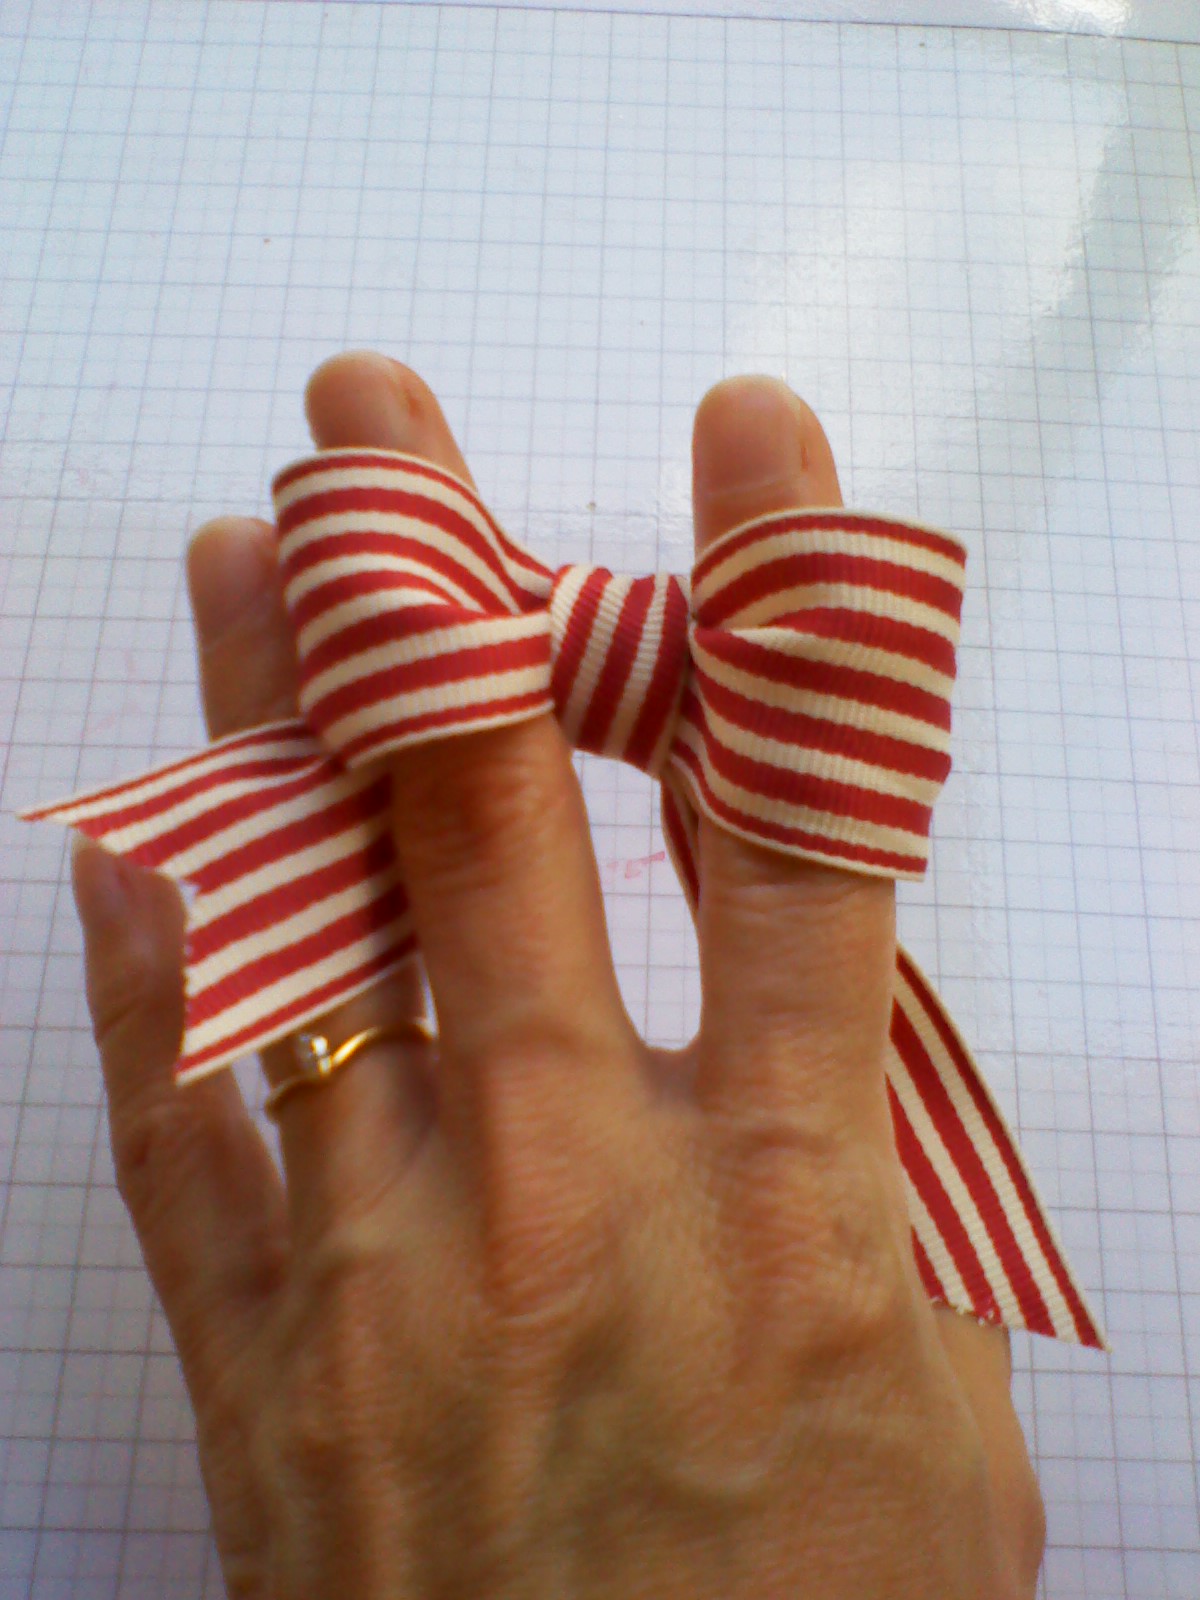
The "Perfect" Bow: Avoiding Twists
One of the most common issues when learning how to tie a bow is having it twist around on itself. This can make your bow look messy, especially with ribbon that has a clear "right" and "wrong" side. But there’s a simple trick to avoid this, which is really helpful.
Starting Right
To prevent twisting, begin by making your first loop with the "good" side of the ribbon facing out. When you bring the second piece of ribbon over and around, make sure it stays flat and doesn't flip over. This is probably the most important step for a twist-free bow, you know.
Instead of just pulling it through, think about how the ribbon is lying. You want to keep the good side visible throughout the process. It’s a small adjustment, but it makes a big difference, honestly.
Keeping Things Flat
As you thread the second loop through, gently twist the ribbon so that the "good" side remains on top. This might feel a little awkward at first, but with a bit of practice, it becomes very natural. You’re essentially guiding the ribbon to stay flat and face forward. It’s a subtle move, but quite effective.
This technique is a guide on how to tie a perfect bow, especially for those ribbons that are different on each side. It helps you keep that lovely pattern or texture visible, which is what you want, after all.
The Final Adjustments
Once your loops are formed, pull them tight while still keeping an eye on the ribbon's orientation. Then, you can adjust the size and shape of your loops and tails. You'll find that with this method, your bow looks much cleaner and more professional. It’s a very satisfying result, you see.
You can then trim the tails to your desired length and style. This method helps ensure that both sides of the bow's "ears" and tails show the correct side of the ribbon, making it look polished. It’s a pretty neat trick, actually.
Beyond the Basics: Different Bow Styles
While the classic bow is a great starting point, there are many different easy ways of tying a bow, with visual charts and step-by-step guides available for all types of knots. We’ll show you a few ideas here, which might spark some creativity. You can really get fancy with it, you know.
Simple Ribbon Bows
For a very simple look, you can just tie a basic knot and then form two loops, pulling them through as described in the classic bow method. This works wonderfully for thin ribbons or when you want a delicate touch. It's less about a big, fluffy bow and more about a neat, understated one. It’s quite elegant, in a way.
These types of bows are perfect for adding a little something to a handmade card or a small gift bag. They are quick to make and still look very charming. They're also great if you're just starting out, so you know.
Layered Bows
To create a fuller, more impressive bow, you can use multiple ribbons. You can tie two or three ribbons together at the center, then tie your bow as usual. This gives the bow more volume and texture. It's a bit more advanced, but the effect is really stunning, honestly.
Another way to layer is to make one bow, and then tie a smaller bow on top of it using a different color or texture of ribbon. This adds depth and visual interest. It's a very creative way to use your ribbons, you know.
Bows for Gifts and Crafts
For gifts, you might want a bow that stands up a bit more. You can achieve this by using wired ribbon, which holds its shape beautifully. Just tie your bow, and then gently shape the loops and tails to create a fuller look. It’s very forgiving, which is nice.
For crafts, like sewing or papercrafts, you can make bows and then attach them with glue or by stitching them down. These simple bows can really elevate a project, making it look more finished and professional. They’re the perfect finishing touch for any craft, after all.
Tips for a Great Bow
Making a perfect bow can seem intimidating, but it’s actually so easy with a few helpful hints. These tips will help you get a beautiful result every time you try to tie a bow. They’re little things that make a big difference, you know.
Choosing the Right Ribbon
The type of ribbon you pick really matters. Satin ribbons give a smooth, elegant look, while grosgrain ribbons offer more texture and hold their shape well. Wired ribbons are fantastic for creating big, fluffy bows that keep their form. Consider the material and width based on what you’re decorating. It’s quite important, you see.
For a complete guide on how to tie a tie, or even a bow tie, and other simple knots, resources like Ties.com offer comprehensive step-by-step guides. They show you different easy ways of tying a necktie with visual charts, which is very similar to how you’d approach learning bows. You can also shop a wide selection of styles and colors of men's neckties on Amazon.com, which sometimes offer free shipping and returns on eligible items, so that's a thought.
Practice Makes Pretty
Just like learning any new skill, practice helps a lot. The more you tie bows, the more natural it will feel, and the better your bows will look. Don't worry if your first few aren't perfect; everyone starts somewhere. People should practice tying knots in front of a mirror for best results, which is a good idea for bows too. You'll know how to tie a tie knot, or a bow, perfectly in 2024, perhaps.
You might want to practice with a piece of string or an old ribbon first, so you don’t waste your good materials. The animations are presented as though the wearer were seeing his own reflection, which is a great way to learn. This approach helps you get the movements down. It’s very helpful, you know.
Styling the Tails
The way you cut the tails of your bow can really add to its finished look. You can cut them straight across, or for a more elegant touch, cut them at an angle or create a "V" shape. This little detail can make your bow look much more professional and polished. It’s a simple trick, but it works.
We’ll share our tips for styling the bow and different ways to cut the tails, so you can make your bows truly unique. These simple bows can be made using thin or thick ribbon, and they’re the perfect finishing touch for any project. You can learn more about bow tying techniques on our site, and also find inspiration for creative ribbon uses here.
Common Questions About Tying Bows
How do you tie a simple bow?
To tie a very simple bow, you start by making a loop with one end of your ribbon. Then, take the other end, bring it over the first loop, and thread it through the center hole you just made. Pull both loops gently to tighten the knot, and then adjust the loops and tails until they look nice and even. It's pretty much like tying your shoelaces, you know.
What is the easiest way to tie a bow?
The easiest way to tie a bow is usually the classic method described above, where you form two "ears" and cross them over. For many, it's the most intuitive approach. With a little practice, it becomes second nature, so it’s very quick. It really is quite simple, honestly.
How do you tie a bow that stays?
To tie a bow that stays put, make sure you pull the knot tight enough without crushing the ribbon. Using ribbon with a bit of texture, like grosgrain, can help it hold better than very slippery satin. For extra security, especially on gifts, you can add a tiny dot of hot glue under the knot, which is a common trick. This helps it really stay, you know.


Detail Author:
- Name : Lorna Hauck PhD
- Username : alden.carroll
- Email : ghaley@schuppe.biz
- Birthdate : 1970-06-14
- Address : 1447 Myrna Lodge Leopoldotown, OR 87376
- Phone : +16296272635
- Company : Nikolaus, Blick and Bruen
- Job : Offset Lithographic Press Operator
- Bio : Nemo perspiciatis aut explicabo eveniet est. Optio quia et dicta nesciunt esse autem in ut. Sint est et autem rerum deleniti vel. Sit sed laboriosam natus similique voluptatem.
Socials
facebook:
- url : https://facebook.com/idell_id
- username : idell_id
- bio : Quo consequatur nihil rerum et nisi.
- followers : 5731
- following : 1937
tiktok:
- url : https://tiktok.com/@idell_herman
- username : idell_herman
- bio : Vel molestiae et porro dolores. Quae nihil et commodi ipsum.
- followers : 2488
- following : 1464
instagram:
- url : https://instagram.com/idell_official
- username : idell_official
- bio : Ut ex fugiat est. Quia et animi ea deserunt. Animi rerum nihil quos dolor ut illo qui.
- followers : 6900
- following : 872


 Bonus
Bonus