

Ever find yourself staring at a blank page, trying to figure out how to draw a nose that looks just right? It's a pretty common spot to get stuck, you know, because noses can feel a bit tricky to get down on paper. Many aspiring artists, and even some experienced ones, sometimes struggle with getting this important facial feature to appear natural and believable. It can be a real sticking point when you're trying to make your portraits come alive, and that's actually why so many people look for simple ways to learn this skill.
The good news is that drawing a nose doesn't have to be a big mystery. It’s actually more about seeing shapes and understanding a few simple ideas than it is about some secret talent. This guide is here to show you how to draw a nose step by step for beginners, making it much less daunting than you might think. We'll break down the process into easy, manageable parts, so you can really get a handle on it.
This article will help you learn how to create a variety of nose shapes using a straightforward method. We’ll cover how to draw a nose from the front, at an angle, and in profile to help you master this challenging facial feature. You can learn how to draw this important part of a face in just a few simple steps, and you'll find that with a little practice, it gets easier, too.
Table of Contents
- Understanding the Basic Structure of a Nose
- Drawing a Nose from the Front View: Step-by-Step
- Drawing Noses from Different Angles
- Tips from the Pros and Further Learning
- Common Questions About Drawing Noses
Understanding the Basic Structure of a Nose
In order to easily draw the nose, we need to take the structure and simplify it to its basic shapes. This is, you know, a very helpful way to approach something that seems complex. Think of it like building blocks; you start with simple forms and then add more detail. This approach really helps demystify the process and makes it much more approachable for anyone wanting to learn.
Below is a diagram of a nose broken down into 3 separate parts. These parts are essentially simplified geometric forms that represent the main mass of the nose. By seeing the nose as these simpler components, it becomes far less intimidating to sketch out. It’s actually a trick many professional artists use to quickly block in facial features before refining them.
The tricks for learning how to draw a nose are within this easy guide for kids, too. It’s all about making it fun and understandable, rather than overly academic. When you understand these basic shapes, you can then begin to manipulate them to create all sorts of different nose types, which is pretty cool, honestly. This foundational knowledge is, in fact, what gives you the freedom to draw many unique faces.
Drawing a Nose from the Front View: Step-by-Step
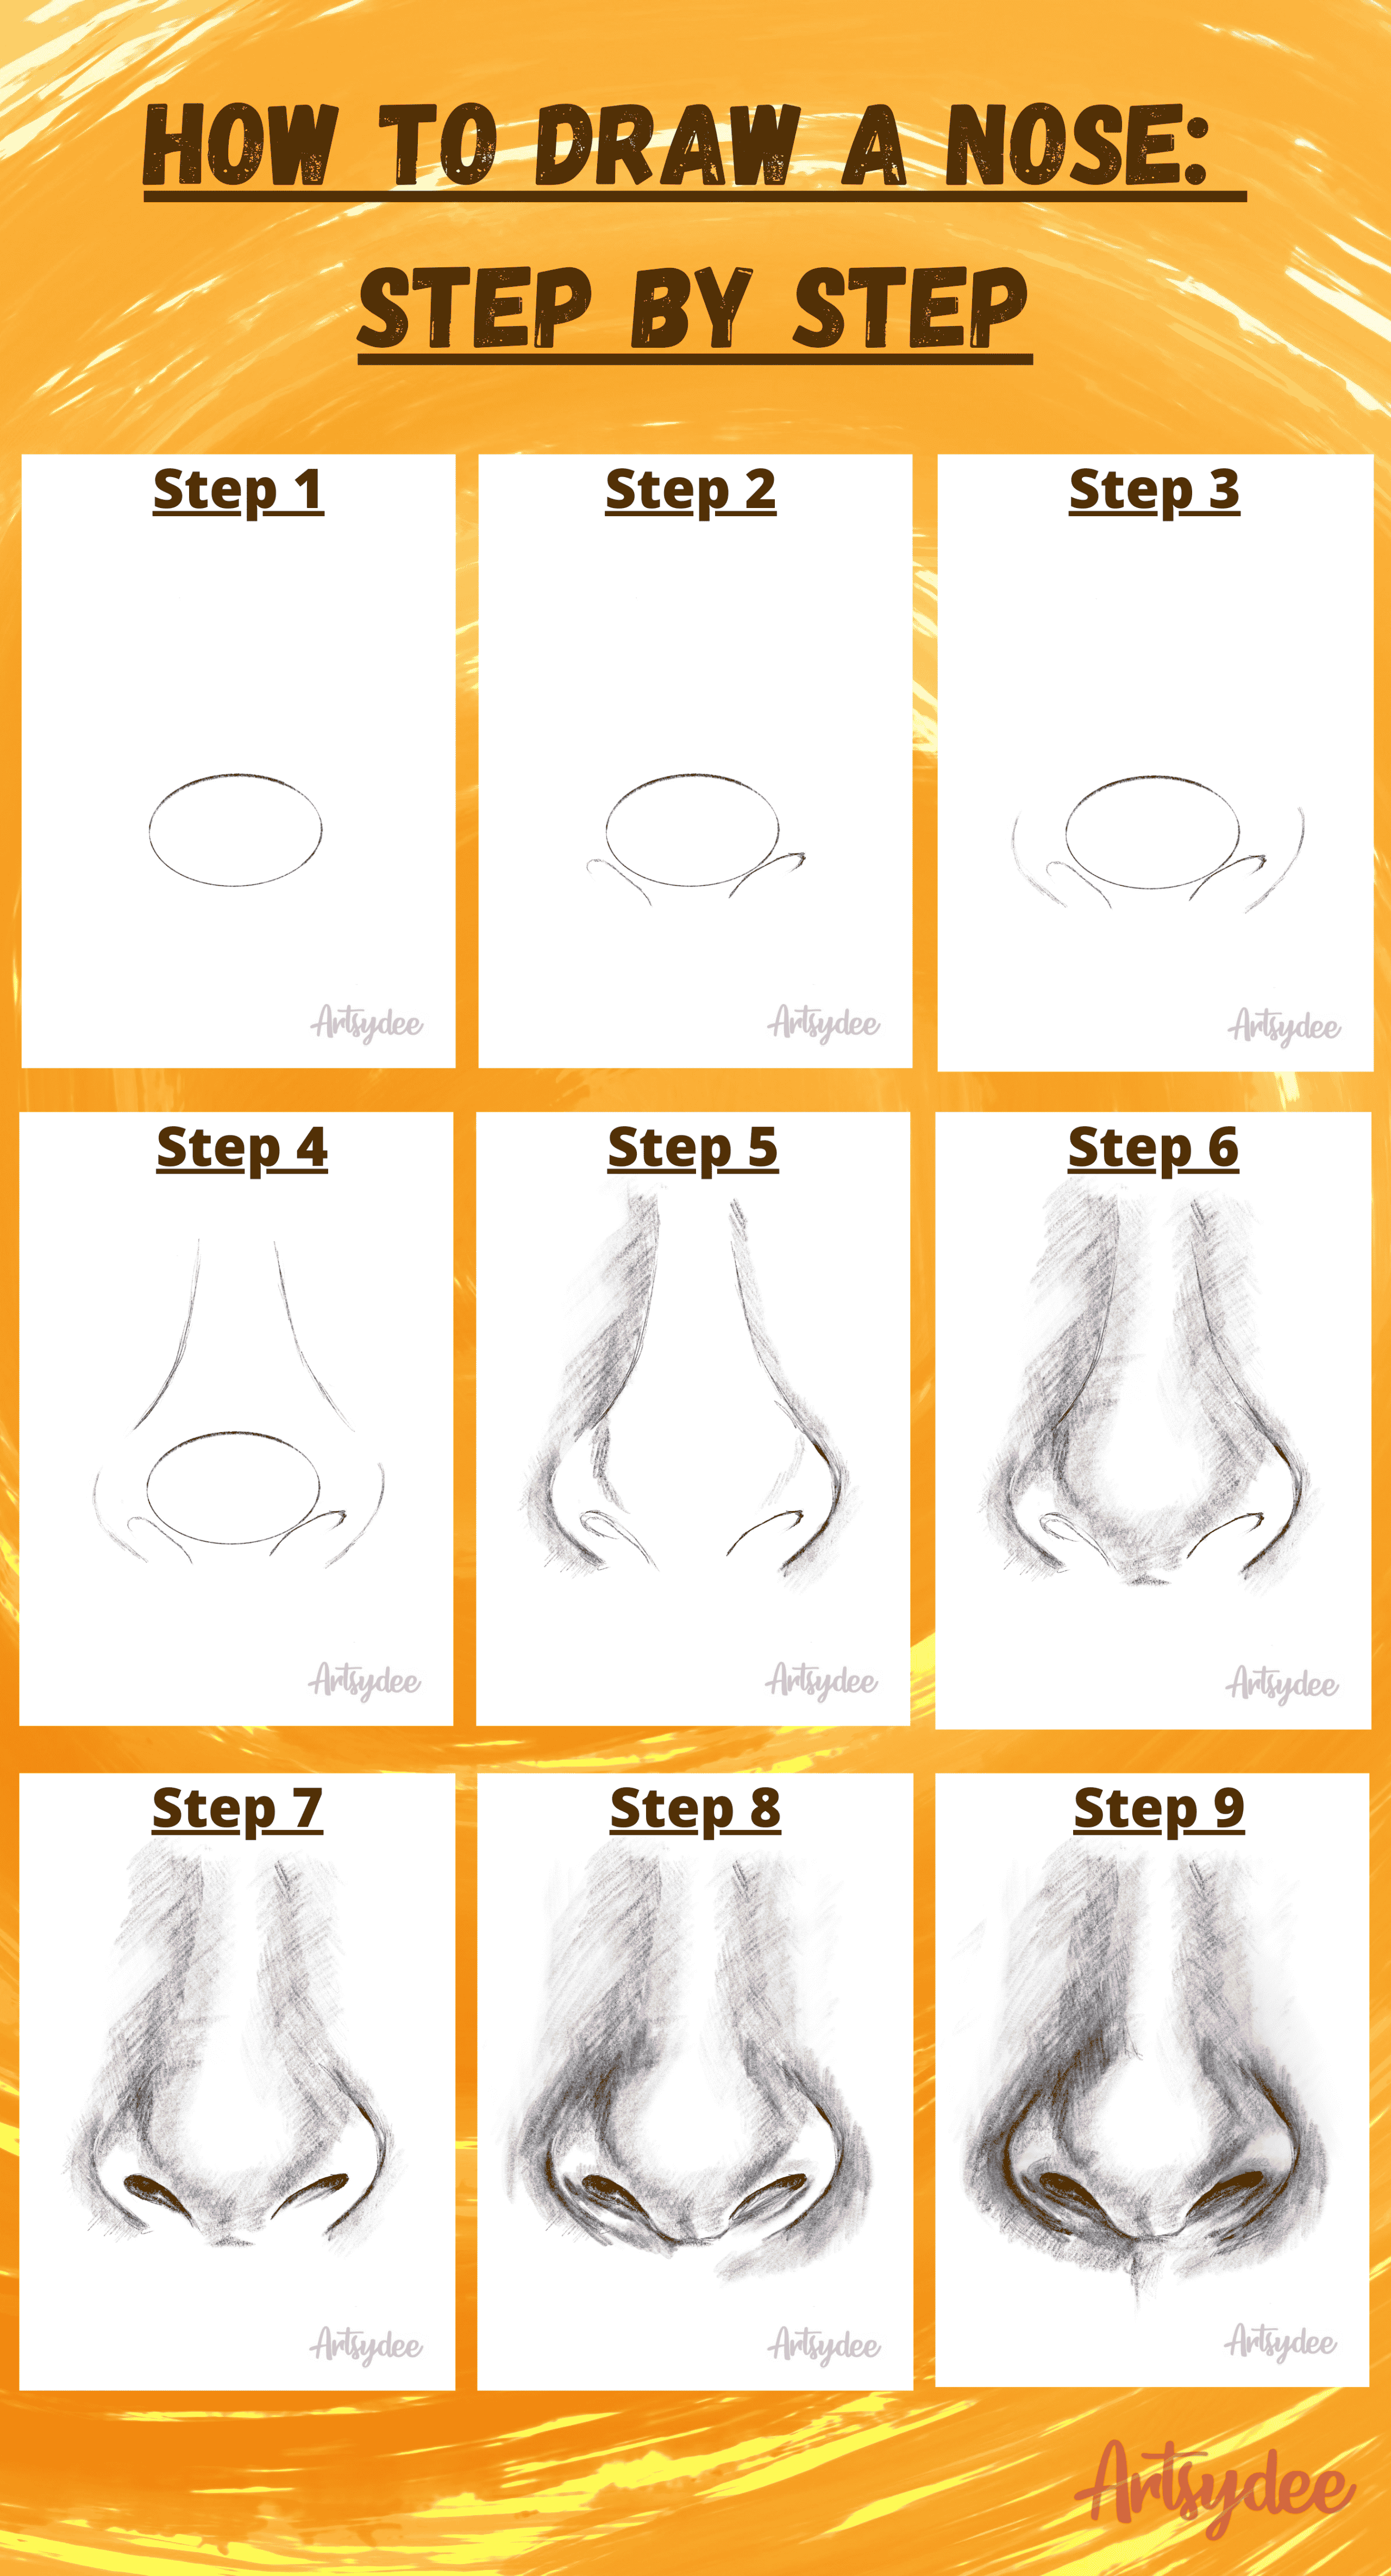
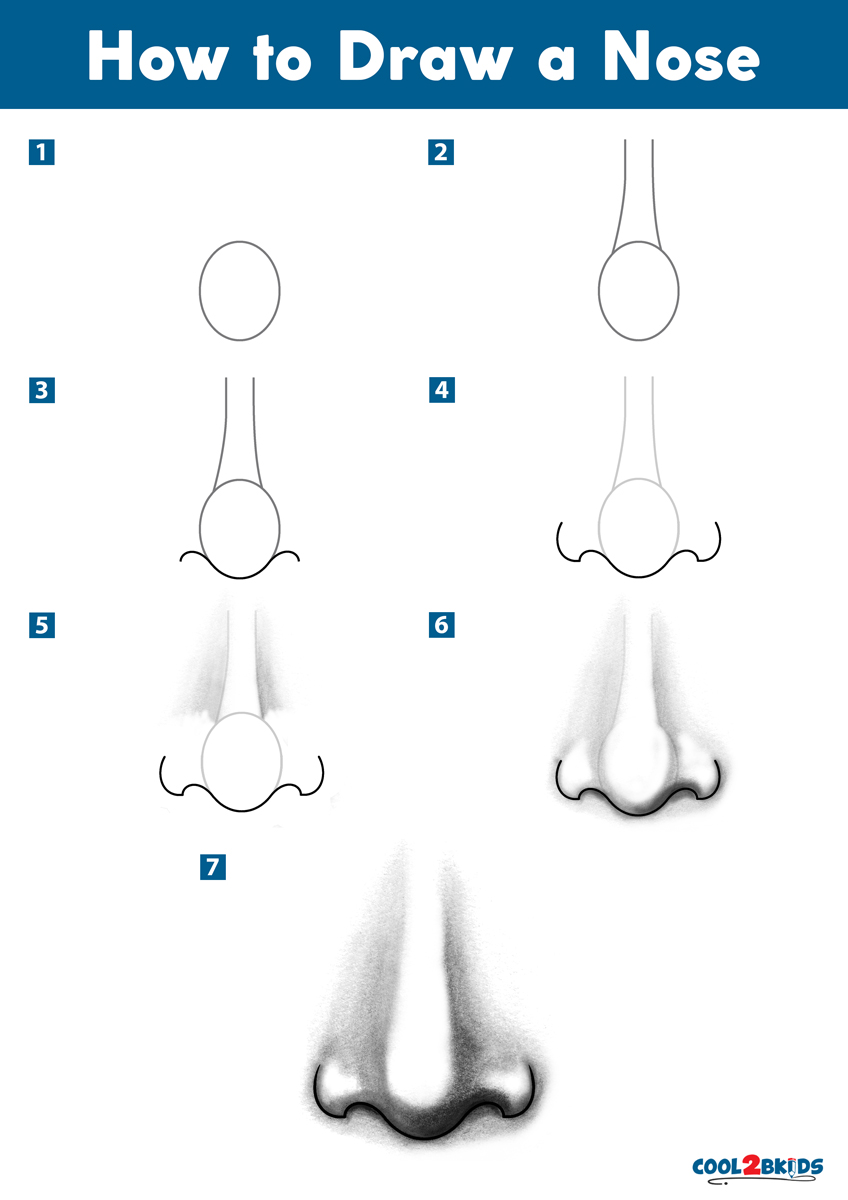
Here is a very simple step by step tutorial on how to draw a nose from the front view. This is a great place to start because it helps you get a feel for the proportions and the overall shape without dealing with perspective shifts just yet. Fortunately, we have curated a step by step tutorial to draw a nose in 9 easy and simple steps, which really breaks it down for you.
Starting with Your Foundation
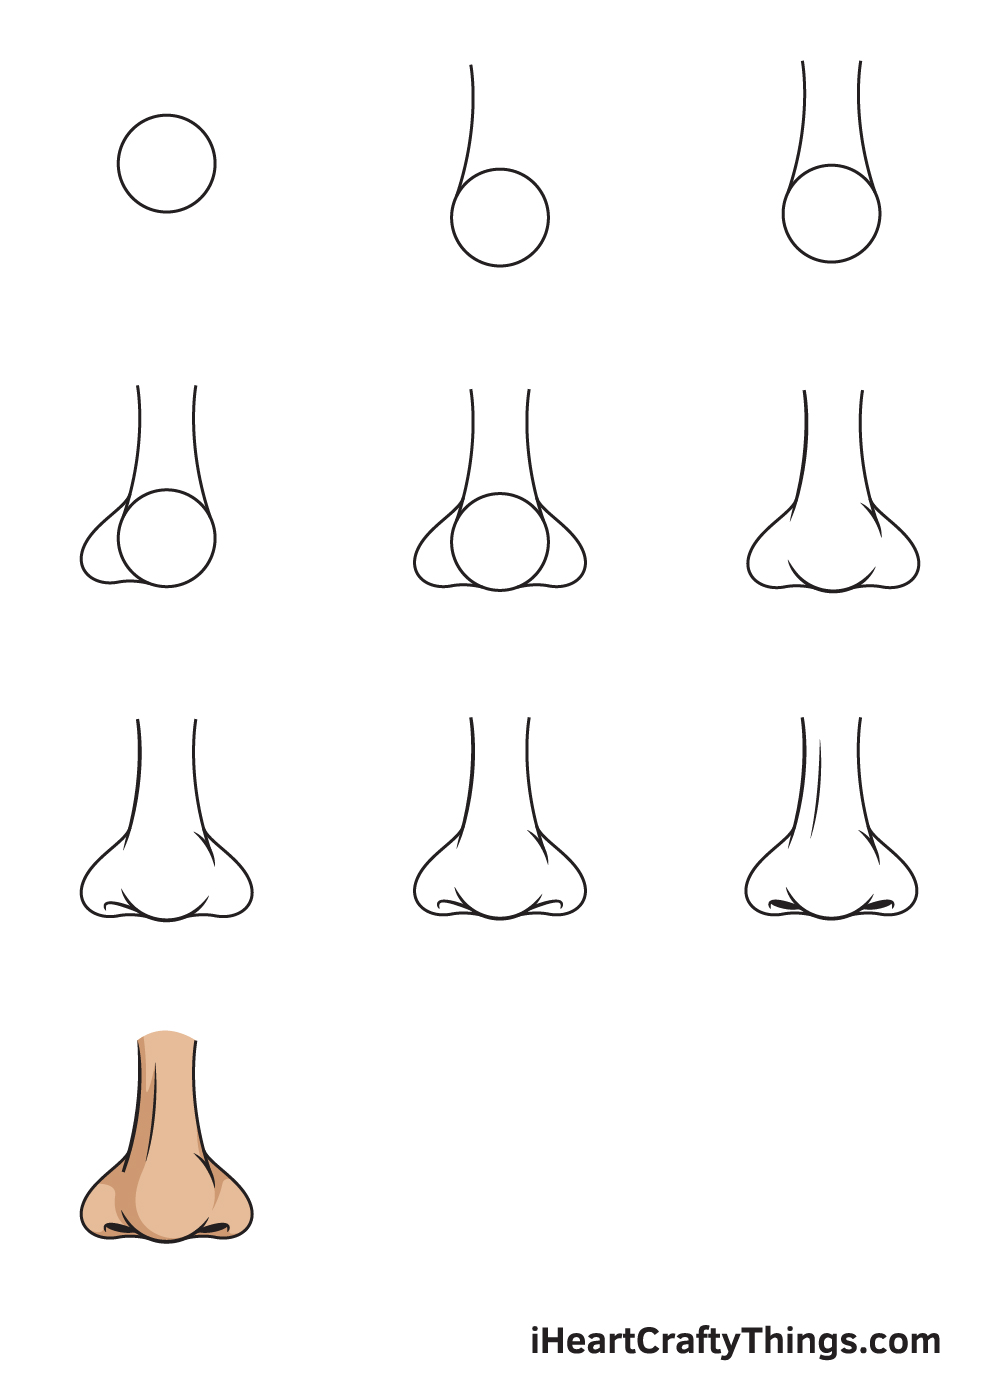
By starting on the lower portion of your paper, draw a small perfect circle. This circle acts as the very base of your nose, representing the ball of the nose, you know, the fleshy tip. It’s like the anchor point for everything else you’re going to add. Make sure it's not too big or too small for the face you're working on, as this will help set the scale for the rest of the feature. This initial circle is, in a way, the most important first step.
Next, you’ll learn how to start your nose sketch with 3 basic guidelines and then… These guidelines are typically light lines that help you place the nostrils and the bridge of the nose. They are just guides, so don’t press too hard with your pencil. They help ensure symmetry and proper placement, which is pretty essential for a balanced look. These lines are really your map for the entire drawing process.
Building the Main Shapes
After your initial circle and guidelines, you will start to connect these basic shapes to form the larger structure of the nose. Think about the sides of the nose, which typically connect from the eyebrows down to the nostrils. You’re essentially building a simple, almost box-like structure around your initial circle. This helps you get the general volume and form down before you worry about the finer details. It's like, really, sketching the skeleton of the nose.
Drawing a nose from the front can be tricky, but by breaking the anatomy into smaller shapes, you make it much more manageable. This means seeing the nose not as one solid mass, but as a collection of planes and curves. For example, the bridge of the nose might be a flatter plane, while the nostrils are more curved. This way of seeing things is, actually, a game-changer for many artists.
Adding Details and Refining Your Nose
Once you have the basic shapes laid out, you can begin to refine them and add the smaller details. This includes defining the nostrils, the alar cartilages (the wings of the nose), and the subtle curves of the tip. Use this guide to master how to draw noses step by step! Remember to keep your lines light at first, so you can easily erase and adjust as you go. This stage is where the nose starts to look, you know, more realistic.
With a few simple pencil strokes, this tutorial and video will show you how to draw a realistic nose. It's about building up the details gradually, rather than trying to get everything perfect in one go. Pay attention to the subtle shadows and highlights, as these are what give the nose its three-dimensional appearance. You might find that adding just a little shading can make a huge difference in how the nose appears on the page, actually.
Drawing Noses from Different Angles
This article covers how to draw a nose from the front, at an angle, and in profile to help you master this challenging facial feature. The same principles of simplifying the structure into basic shapes apply, no matter the view. It’s all about adjusting those initial circles and guidelines to reflect the new perspective. You'll find that once you grasp the front view, adapting it to other angles is, like, a natural progression.
The Nose at an Angle
When drawing a nose at an angle, you’ll still start with that foundational circle for the tip, but it will appear more elliptical or oval, depending on how much the head is turned. The guidelines for the bridge and nostrils will also shift, showing more of one side of the nose than the other. This view really helps you practice showing depth and form on a two-dimensional surface. It’s, in some respects, a great way to push your understanding of perspective.
You’ll need to pay close attention to how the light falls on the nose from this angle, as it will create different shadows and highlights compared to a straight-on view. The nostril that is further away will appear shorter and less defined, for example. This is where your observation skills really come into play, and it’s actually quite fun to see how the nose changes as the head turns.
Drawing a Nose in Profile
Drawing a nose in profile is, in a way, a bit different but still relies on those basic shapes. Instead of a circle for the tip, you might start with a rounded triangle or a similar shape that defines the overall silhouette of the nose from the side. The bridge will be a distinct line, and the nostril will be clearly visible from this view. This perspective really highlights the unique shape of an individual’s nose.
This tutorial gives you a basic look at the shapes and anatomy needed for drawing realistic noses. When you draw a nose in profile, you're focusing on the curve of the bridge, the angle of the tip, and the shape of the nostril opening. It’s all about capturing that unique outline against the rest of the face. You might find it easier or harder than the front view, depending on your personal drawing style, but it’s still very much about simplifying the forms.
Tips from the Pros and Further Learning
Plus, we spoke with professional artist Kelly. She emphasizes the importance of observation and not being afraid to simplify. Kelly suggests spending time just looking at different noses—in photos, on people, even your own in a mirror. This helps you build a visual library in your mind, which is, honestly, invaluable for drawing. She also reminds us that every nose is unique, so don't expect them all to look exactly the same.
Learn how to draw a nose and improve your art skills with this fun video course from Sycra Yasin which shows you how to draw noses from any angle easily. Video tutorials can be incredibly helpful because you can see the strokes in real-time, which is, like, a big advantage for visual learners. Sycra's approach, much like this guide, focuses on breaking down the complex into manageable parts, making it accessible for everyone.
Make sure to watch my other tutorials on facial features, too. Learning to draw a nose is just one part of creating a compelling portrait. The nose needs to fit well with the eyes, mouth, and overall head shape. Practicing each feature separately, and then putting them together, is a really good way to improve your overall portrait drawing skills. You can learn more about drawing techniques on our site, and there's also a great resource on understanding facial proportions available here.
Remember, practice is key, and it’s okay if your first few attempts aren't perfect. Every artist starts somewhere, and the journey of learning how to draw a nose is a rewarding one. Just keep at it, and you'll definitely see improvement over time, which is, you know, the most satisfying part. You can always find inspiration and tips from other artists on sites like DeviantArt, for example.
Common Questions About Drawing Noses
How do I make my drawn nose look realistic?
To make your drawn nose look realistic, focus on subtle shading and highlights to create dimension, and really pay attention to the unique forms of the nose rather than just drawing an outline. Breaking the anatomy into smaller shapes, as we discussed, really helps here, as does observing real noses to understand their subtle curves and planes. It’s, in fact, all about light and shadow.
What are the basic shapes to start with when drawing a nose?
When you're starting to draw a nose, you typically begin with a simple circle for the ball of the nose, and then add basic shapes like triangles or trapezoids for the bridge and the wings of the nose. These initial shapes act as your foundational structure, which you then refine. It’s actually a very common and effective method for blocking in the form quickly.
How do I draw a nose from different angles?
To draw a nose from different angles, you apply the same basic shape principles but adjust them for perspective. For an angled view, your initial circle for the tip might become an oval, and the guidelines will shift to show more of one side. For a profile, you focus on the distinct silhouette and curves of the nose from the side. It's really about adapting those initial simple forms to the new viewpoint, which is, you know, a skill that develops with practice.
Detail Author:
- Name : Payton Osinski
- Username : qweissnat
- Email : hilario.rohan@gmail.com
- Birthdate : 1998-12-17
- Address : 657 Eichmann Club Suite 411 Lisettehaven, TX 92099-7332
- Phone : 757-655-4719
- Company : Daniel Ltd
- Job : Conservation Scientist
- Bio : Quaerat magni quibusdam quis dolorem. Maxime eius quia eaque minus numquam consectetur. Et ducimus consequatur expedita ab quod et non aut. Voluptas delectus qui tenetur qui.
Socials
tiktok:
- url : https://tiktok.com/@qhyatt
- username : qhyatt
- bio : Quo eaque eos veniam fugiat occaecati excepturi.
- followers : 5860
- following : 2315
twitter:
- url : https://twitter.com/hyatt2020
- username : hyatt2020
- bio : Ut deserunt quis commodi est consequatur. Eos quia reprehenderit velit quo. Incidunt illum sunt ipsa non.
- followers : 688
- following : 2586


 Bonus
Bonus