

Do you ever feel a little spark, you know, when you see a really cute bunny? Perhaps you think, "I wish I could draw something that sweet." Well, good news! Learning how to draw a bunny can be a surprisingly fun and rewarding activity, perfect for anyone who enjoys bringing adorable animals to life on paper. It's a way to express creativity, and honestly, it’s quite relaxing too.
So, whether you're just starting out with art or you've been sketching for a while, these easy methods are here to guide you. You might discover a new favorite hobby, or simply enjoy making something lovely for yourself or a friend. It's about having a good time with a pencil and paper, really.
This post will help you learn how to draw a cute bunny from scratch, using basic shapes and simple lines. By the end, you'll be quite surprised at how easy it actually is to create your very own charming rabbit. Grab a pencil, and let’s get started!
Table of Contents
- Why Learn How to Draw a Bunny?
- Your Guide to Drawing a Bunny: What You'll Discover
- Method 1: Drawing a Bunny with Basic Shapes
- Method 2: Drawing a Bunny with Simple Lines
- Method 3: Drawing a Bunny with Realistic Details
- Method 4: Drawing a Bunny Using the Number 22
- Method 5: A General Step-by-Step Approach to Bunny Drawing
- Frequently Asked Questions About Drawing Bunnies
- Ready to Draw Your Own Cute Bunny?
Why Learn How to Draw a Bunny?
Drawing bunnies offers a wonderful entry point into the world of animal art, you know. They are often seen as symbols of sweetness and innocence, making them a very popular subject for artists of all ages. For kids, beginners, and really anyone inspired by cute animal drawings, a bunny is a perfect choice.
It's about more than just making a picture, too. The process of drawing helps improve your observation skills and hand-eye coordination. Plus, there's just something incredibly satisfying about creating a cute creature from simple lines and shapes, isn't there?
Learning how to draw a bunny is a skill that can be applied in many ways. You might draw them for greeting cards, personal illustrations, or just for the sheer joy of it. It’s a pretty versatile subject, and you can make them as simple or detailed as you like, which is nice.
Your Guide to Drawing a Bunny: What You'll Discover
This tutorial is designed to teach you how to draw a bunny using several different methods. We'll explore approaches featuring basic shapes, simple lines, and even some realistic details. It’s a pretty comprehensive look, so you’ll have plenty of options.
You’ll learn how to draw a bunny step by step, breaking down the process into easy-to-follow instructions. We’ll cover various topics related to drawing rabbits and bunnies, giving you a solid foundation. You know, it’s all about making it approachable.
There's even a printable guide and a video to watch, which you can use as extra help. These resources are there to support your learning journey, making it easier to follow along at your own pace. So, you have options, basically.
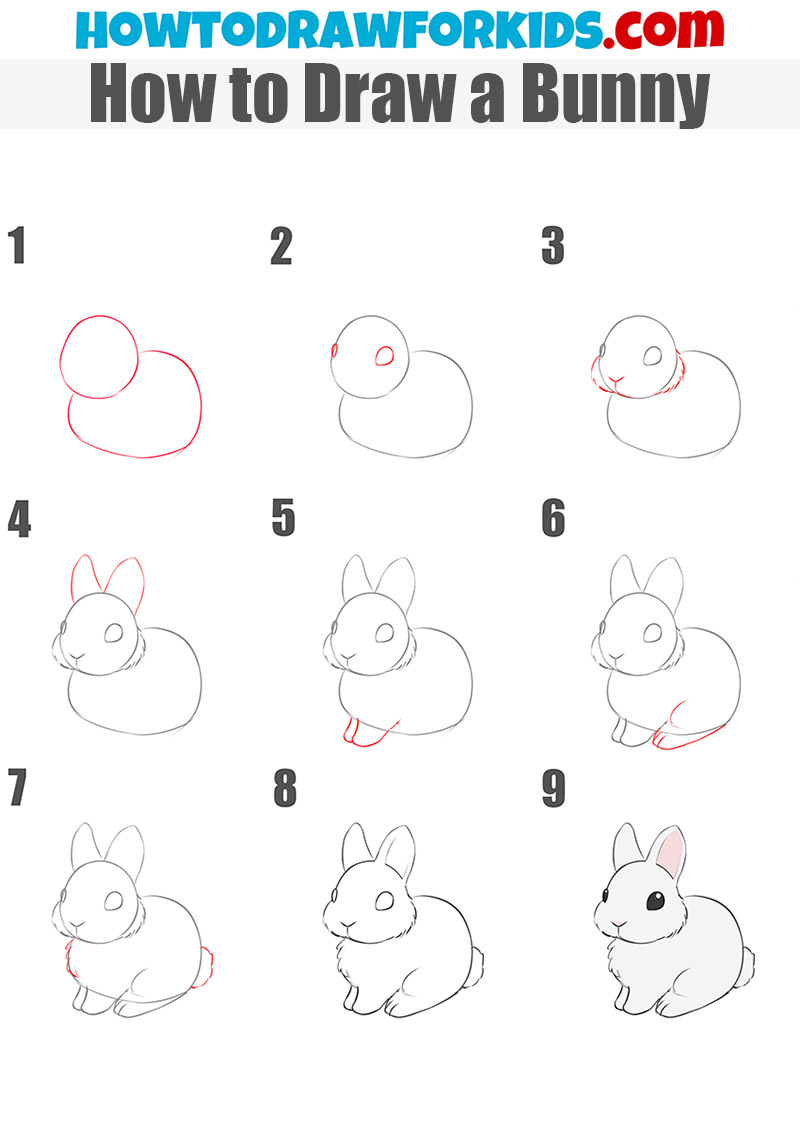
Method 1: Drawing a Bunny with Basic Shapes
One of the easiest ways to start drawing a cute bunny is by using basic shapes. This method helps you get the proportions right and build a solid foundation for your drawing. It’s like creating a skeleton for your bunny, you know, before adding the skin.
You'll discover how to draw a cute bunny easily with simple shapes. This approach is really good for beginners, as it simplifies the complex forms into something more manageable. It's a very forgiving way to start, which is nice.
Starting with Simple Forms
To begin, you might want to sketch a couple of circles for the head and body. Make one circle for the head, perhaps a bit smaller, and then a larger one for the body, placed slightly below and overlapping. This gives you the basic structure, more or less.
Then, you could add a big oblong shape, you know, on one side. This oblong shape will form a significant part of the bunny’s body, giving it that initial plump look. It’s almost like building blocks, really.
These initial shapes don’t need to be perfect, by the way. They are just guides to help you determine the overall size and position of your bunny on the paper. Just keep them light, so you can erase them later, you know.
Adding Key Features
Once you have your basic shapes, you can start to add other simple forms. For instance, you might add two long, oval shapes for the ears extending from the top of the head circle. These should be a bit narrower at the base, typically.
You could also draw smaller circles or ovals for the feet, connecting them to the main body shape. This helps to ground your bunny, making it feel like it’s standing on something. It’s pretty straightforward, really.
Now, to define the face, add curved lines on the bunny’s face to help you determine the position of the eyes. These lines are just guidelines, you know, to make sure your bunny's features are placed correctly. It's all about planning, basically.
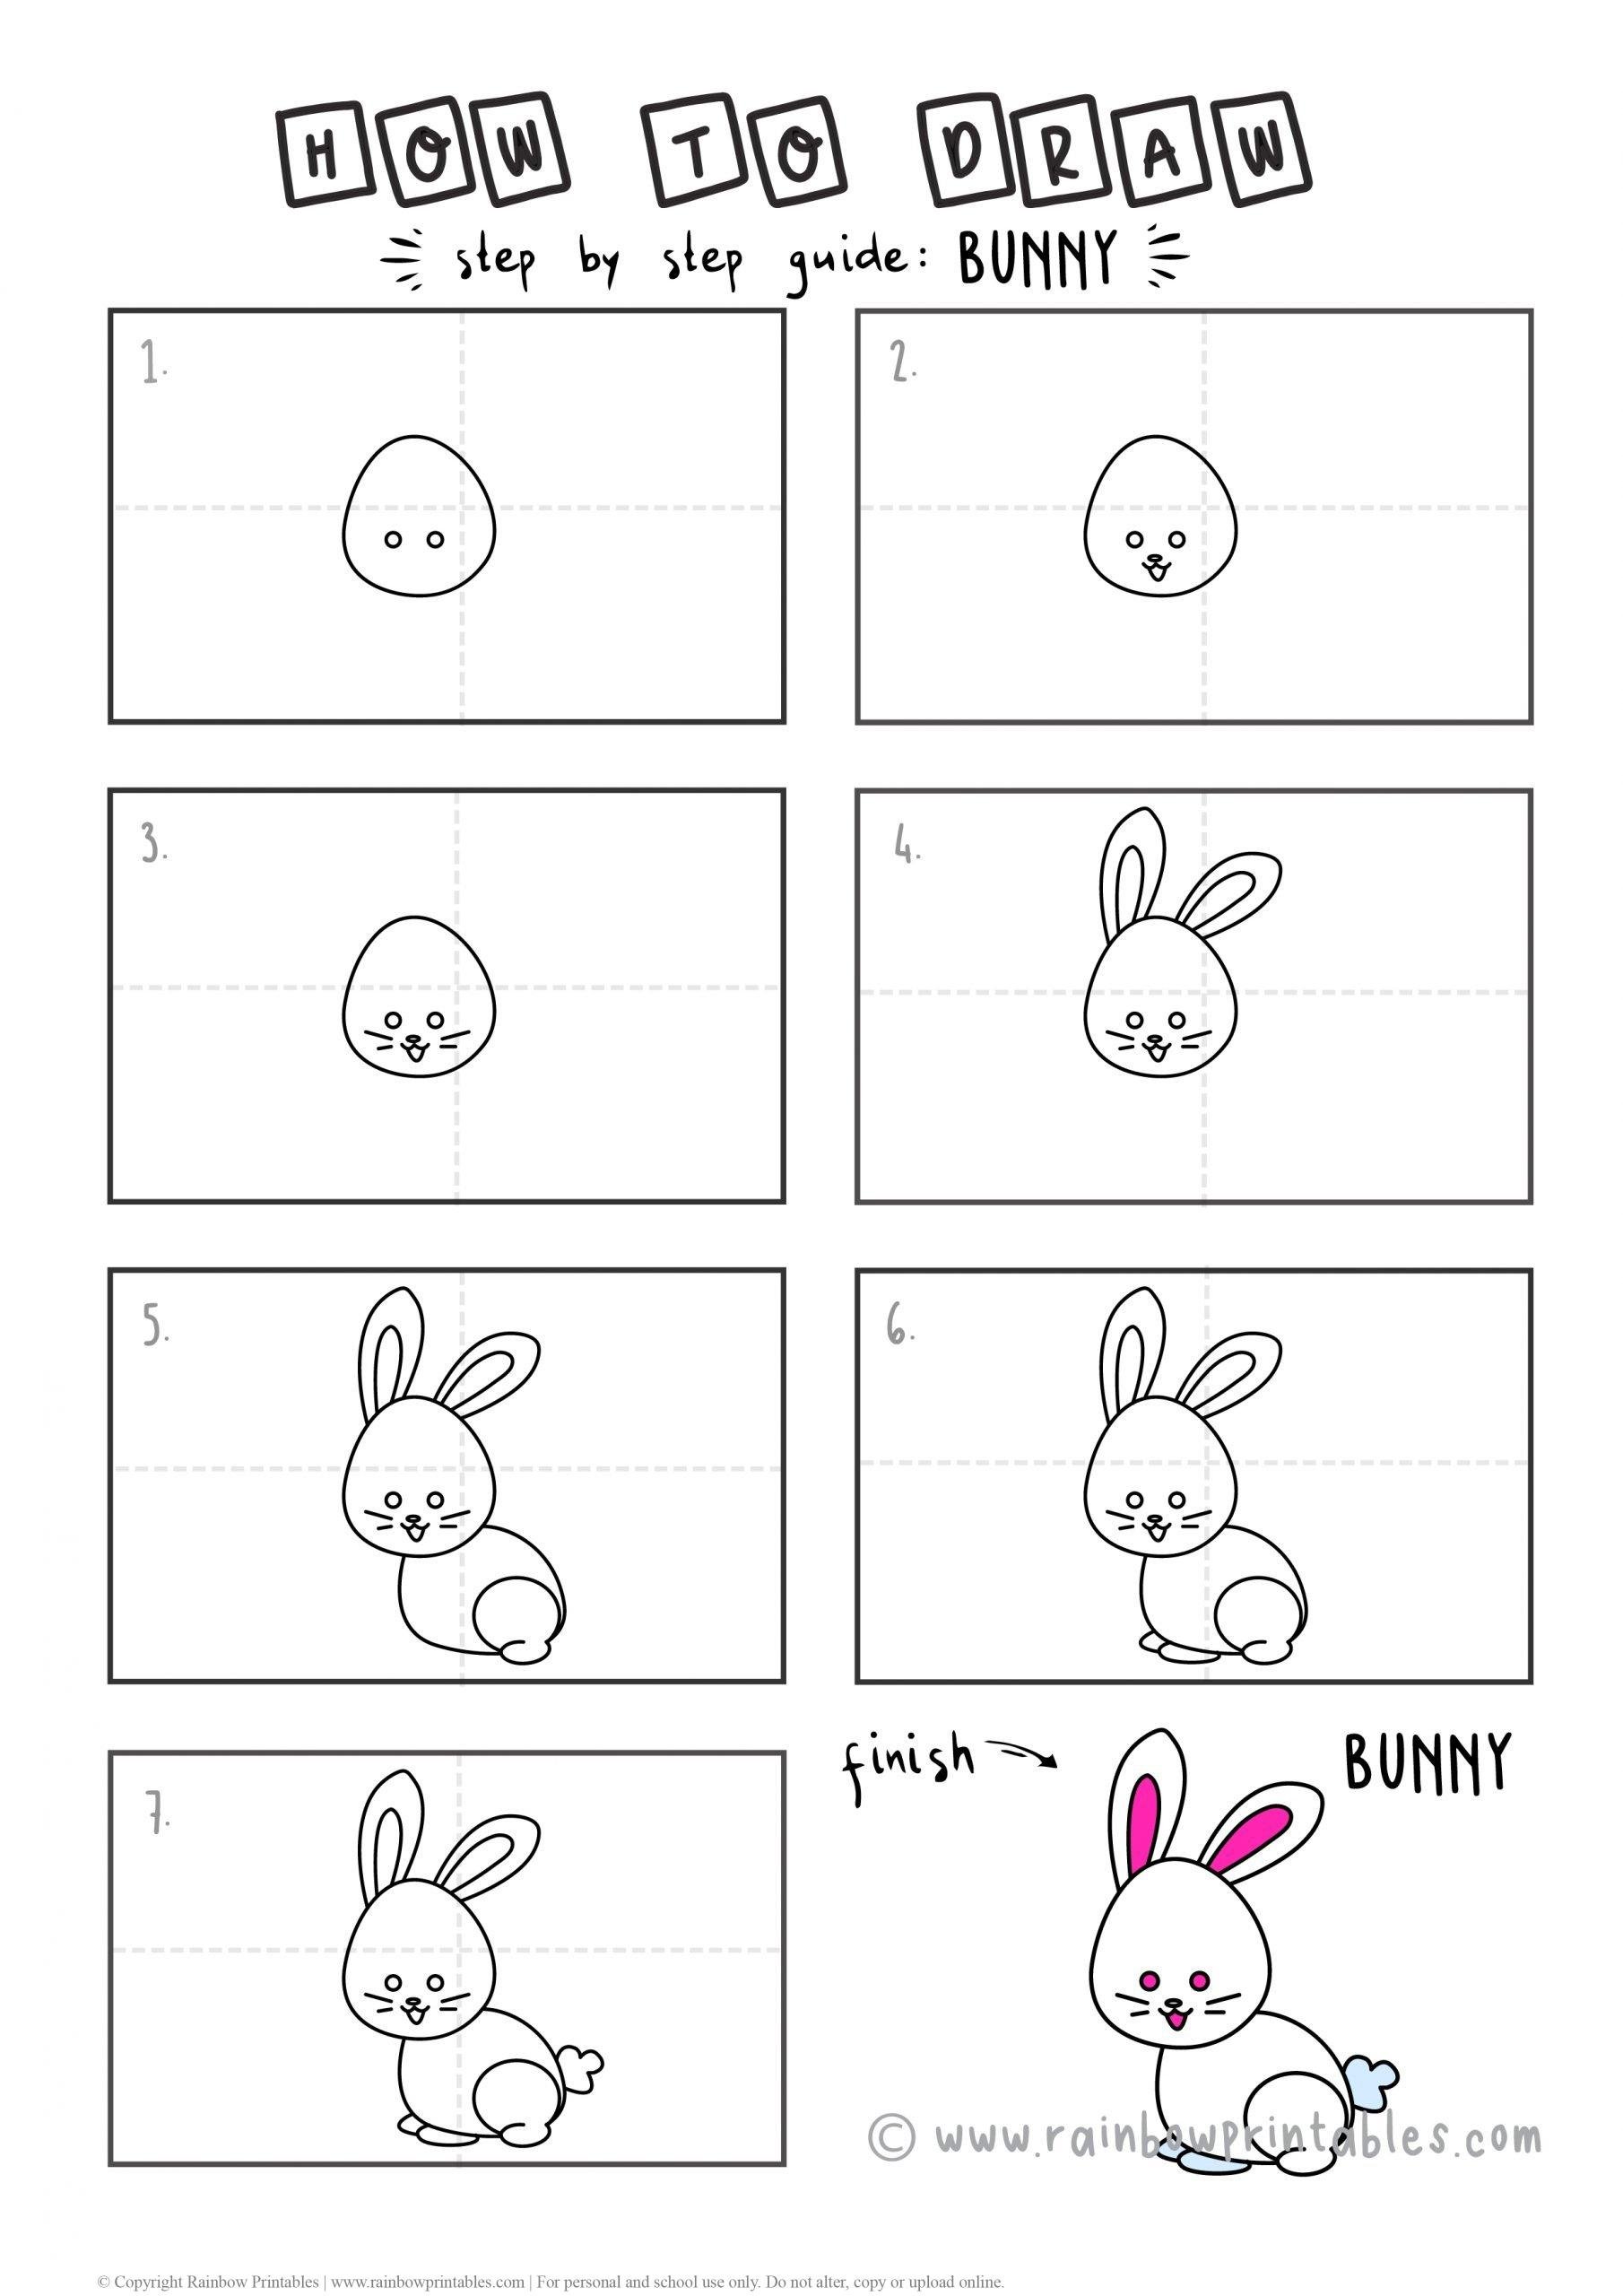
Method 2: Drawing a Bunny with Simple Lines
This method focuses on using simple, flowing lines to create the bunny's form without relying heavily on initial geometric shapes. It's a bit more intuitive, you know, and allows for a softer, more organic look. It’s pretty direct.
You'll learn how to draw a bunny with this step-by-step tutorial that emphasizes line work. This approach is great for those who prefer to sketch freely and build up the form as they go. It's a different way to think about drawing, really.
Crafting the Outline
Start by sketching the general outline of the bunny’s head and body with light, continuous lines. Think about the overall shape of a bunny sitting or standing, like your typical rabbit. It’s about capturing the flow, basically.
Then, you might draw the ears with two slightly curved lines that meet at a point at the top. You can add a subtle curve inside each ear to show the inner part. This gives them a bit of dimension, you know.
Next, sketch the legs and feet using simple curved lines. Keep them soft and rounded to give that characteristic bunny look. It's almost like drawing soft little bumps, you see.
Defining Facial Features
For the face, draw a curved line on the side of the top circle to represent the bunny’s nose. This line helps to define the snout area. It's a small detail, but it makes a big difference, you know.
Add curved lines on the bunny’s face to help you determine the position of the eyes. These lines are just guides, remember, to make sure your eyes are placed correctly and look natural. They are very helpful, actually.
You can then draw simple dots or small ovals for the eyes, placing them along those guide lines. A tiny dot for the mouth under the nose can complete the basic face. It's pretty quick to do, really.
Method 3: Drawing a Bunny with Realistic Details
Once you’re comfortable with basic shapes and simple lines, you might want to add more realistic details to your bunny drawing. This method takes your drawing to the next level, making it look more lifelike. It’s a bit more involved, you know, but very rewarding.
This approach involves paying closer attention to the textures and subtle forms that make a bunny look real. It's about observing more closely and adding those finer touches. You know, like how a real bunny looks, more or less.
Building on Basic Structures
Begin with the basic shapes or lines for the head and body, as you did in the previous methods. These foundational elements are still important, even when going for realism. They are, you know, your starting point.
Instead of just simple outlines for the ears, you might add more defined curves and perhaps a slight thickness to them. Think about how light would hit the ears, creating subtle shadows. It’s a little bit more advanced, arguably.
For the body, consider the natural curves and folds of a bunny’s fur and muscles. You can use very light, feathery strokes to suggest the softness of the fur, rather than just a hard outline. This adds a lot of character, you know.
Refining the Look
When adding the nose, draw a more detailed shape, perhaps a small inverted triangle or a heart-like form, and then shade it slightly. This makes it look more three-dimensional. It's a small touch that adds a lot, you know.
For the eyes, instead of just dots, draw a small circle with a smaller dark pupil inside. You might even add a tiny highlight to make the eye sparkle, giving it life. This is a very common technique, actually.
You can also add whiskers by drawing thin, light lines extending from the snout. And, for the fur texture, use short, quick strokes that follow the direction of the fur growth. This is a subtle way to add realism, basically.
Method 4: Drawing a Bunny Using the Number 22
Did you know you can draw a super cute bunny using the number 22? This is a really fun and easy trick, especially great for kids or anyone looking for a quick, clever way to sketch a bunny. It’s pretty neat, actually.
This method transforms a simple number into the foundation of an adorable creature. It’s a bit like magic, you know, seeing how a common digit can become something so charming. It's a very accessible drawing idea.
The Clever Number Trick
Start by writing down the number 22 on your paper. Make sure the two numbers are close together, but not touching, and perhaps a little bit large. This will be the starting point for your bunny, you know.
One of the '2's will form the bunny's head, and the other '2' will become part of its body. It’s pretty clever how it works out, honestly. Just visualize the bunny taking shape around these numbers.
You might want to sketch the number lightly at first, so you can easily erase parts of it later. This gives you flexibility as you transform the numbers into your cute bunny. It's a good habit, basically.
Bringing Your Bunny to Life
Now, connect the top of the first '2' to the top of the second '2' with a curved line to form the top of the bunny's head. The loops of the '2's will naturally become the bunny's ears. It's quite intuitive, really.
Extend a line from the bottom of the second '2' to create the bunny's body, perhaps adding a small curve for a tail. You can then add a small circle for an eye inside the first '2' and a tiny nose. It's almost done, you see.
Finally, draw a simple line for the mouth and perhaps some small lines for the feet at the bottom. You'll be surprised at how easy it is to create a cute bunny using just these numbers. It's a very satisfying trick, you know.
Method 5: A General Step-by-Step Approach to Bunny Drawing
This method combines elements from various drawing techniques, offering a comprehensive step-by-step tutorial on how to draw a bunny. It’s like a blend of all the good parts, you know, making it very flexible. This wikihow will teach you how to draw a bunny effectively.
It’s designed to be an easy step-by-step tutorial, guiding you through each stage of the drawing process. This approach is very structured, which many people find helpful when learning something new. It’s pretty straightforward, really.
Laying the Foundation
Begin by sketching two main shapes: one for the head and one for the body. The head might be a circle or a slightly oval shape, and the body could be a larger oval or an oblong shape. Keep these lines light, you know, as they are just guides.
You might then add a big oblong shape on one side, which will form a significant part of the bunny’s body. This helps to establish the overall volume and posture of your bunny. It's a pretty important first step, actually.
These initial shapes help you lay the groundwork for your bunny, ensuring good proportions before you add the finer details. It’s like building a house, you know, you start with the foundation. This is very important, basically.
Adding Distinctive Marks
Next, draw the ears. These are typically long and oval-shaped, extending upwards from the head. You can give them a slight curve to make them look more natural. They are a very recognizable feature, aren't they?
For the face, draw a curved line on the side of the top circle to represent the bunny’s nose. This simple line helps to define the snout area and gives the bunny its characteristic look. It's a crucial detail, you know.
Add curved lines on the bunny’s face to help you determine the position of the eyes. These are guide lines, remember, to make sure your bunny’s eyes are placed correctly and symmetrically. They are very useful, you know.
Then, you can draw the eyes themselves, perhaps small circles or ovals, and add a small dot for the pupil. A tiny mouth can be a simple curved line or two small curves meeting at a point. It’s pretty simple, really.
Finally, sketch the legs and feet, making them rounded and soft. You can also add a fluffy tail, which is often just a small circle or puff at the back. These final touches bring your bunny to life, you know.
There is even a printable guide and a video to watch if you prefer visual instructions. You can find more helpful resources like these at art supplies central, for instance. These extra aids can really make a difference, you know, in your learning process.
Frequently Asked Questions About Drawing Bunnies
People often have questions when they are learning how to draw a bunny. Here are some common ones that might help you, too.
Q: What are the easiest shapes to start with when drawing a bunny?
A: The easiest shapes to begin with are circles and oblong shapes. You know, a circle for the head and a larger oblong for the body. These simple forms provide a great base for your bunny drawing, making it pretty straightforward.
Q: How do I make my bunny drawing look cute?
A: To make your bunny drawing look cute, you can focus on making the eyes a bit larger and rounder, and perhaps adding a small, soft nose and mouth. Using gentle, curved lines throughout the drawing also helps. It's about giving it that soft, appealing look, basically.
Q: Are there any resources to help me draw a bunny step by step?
A: Yes, absolutely! This very tutorial provides step-by-step guidance. Also, as mentioned, there's a printable guide and a video you can watch. You can learn more about our main drawing page on our site, and find more tips on this very tutorial, for example.
Ready to Draw Your Own Cute Bunny?
You’ve now explored several different methods for how to draw a bunny, featuring basic shapes, simple lines, and even realistic details. From starting with a big oblong shape to drawing a curved line for the nose, you have a lot of tools now. It's pretty amazing, really, what you can create.
Whether you're looking to sketch the cutest bunny for fun or you want to master easy rabbits and bunnies drawing ideas, these step-by-step drawing tutorials are here to help. You know, it's all about practice and having a good time with it. So, why not grab your pencil and paper right now and give it a try?

Detail Author:
- Name : Anne Fadel
- Username : macejkovic.colleen
- Email : jconsidine@yahoo.com
- Birthdate : 1989-09-04
- Address : 8547 Abel Plains Apt. 959 Eichmannfort, OK 46104-8740
- Phone : 1-347-445-2337
- Company : Cummings, Dietrich and Beer
- Job : Marketing Manager
- Bio : Explicabo vel repudiandae officia nisi id nihil. Dolore et eius blanditiis laborum. Et dignissimos vel ad et. Quam sed quasi consequuntur libero eaque. Est accusantium velit sed non culpa ut.
Socials
instagram:
- url : https://instagram.com/imani1458
- username : imani1458
- bio : Quaerat est ea itaque ut. Et vel itaque sunt repellat nisi aut. Voluptatum quia odit quasi.
- followers : 3655
- following : 1205
twitter:
- url : https://twitter.com/imani_xx
- username : imani_xx
- bio : Ex ut itaque totam aliquid repellat qui impedit. Ex tenetur reiciendis quo esse nostrum qui. At officia ea est modi.
- followers : 1133
- following : 2892
facebook:
- url : https://facebook.com/iskiles
- username : iskiles
- bio : Cum magni autem quia voluptatum.
- followers : 2462
- following : 2636


 Bonus
Bonus