

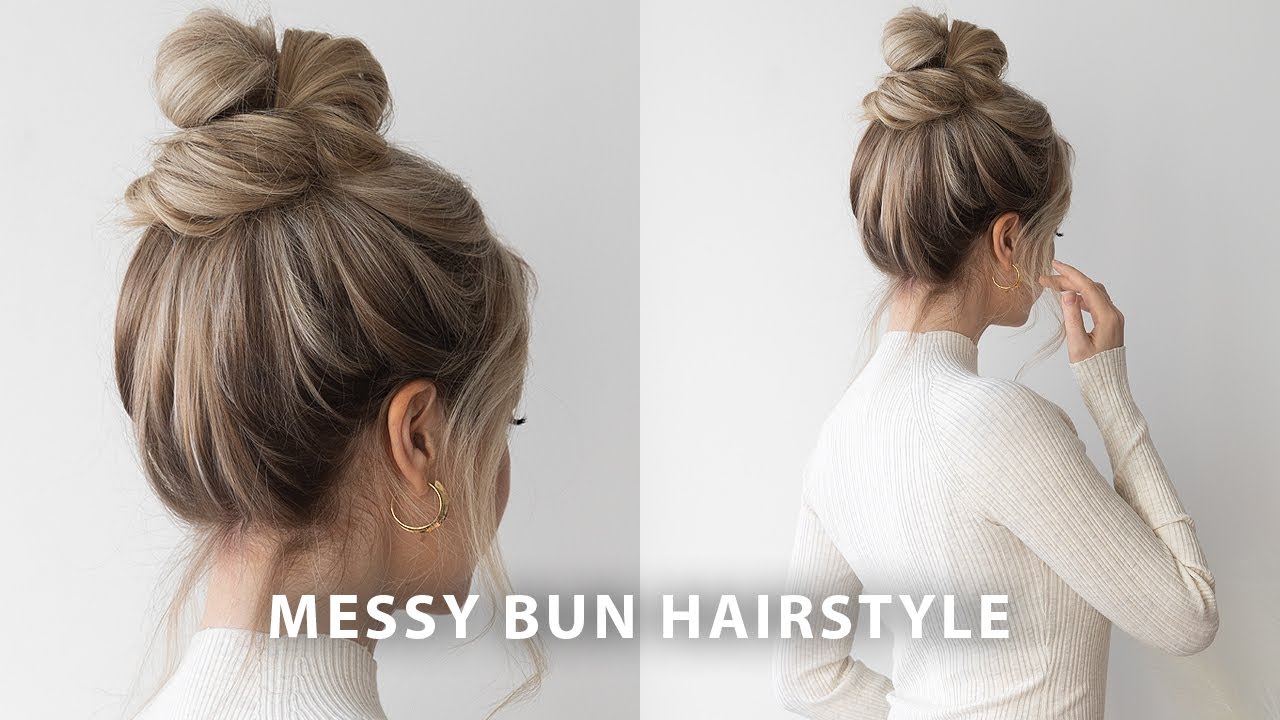
The messy bun, that wonderful, seemingly simple hair arrangement, has become a true favorite for many, you know? It's that look that feels just right, whether you're heading out for a quick errand or getting ready for a relaxed evening. This style, actually, brings a kind of easy elegance that's hard to beat, making it a popular choice for all sorts of moments in life. It's almost like a secret weapon for those days when you want to look put together without trying too hard, so it really does fit into anyone's busy schedule.
You might think putting a messy bun together is just a quick toss of your hair, and in a way, it is. As my text says, "No matter how you throw your messy bun together, the end." But there are little tricks, little touches that can make all the difference in getting that perfectly imperfect look. We're talking about a style that can truly save your day, offering a quick fix that still looks stylish and thoughtful.
This hair guide, for instance, focuses on helping you master this wonderful style. It’s pretty much the quickest messy bun instruction you’ll find, perhaps just 60 seconds, as my text points out. We've even gathered insights from people who know hair well, including some professional stylists, to give you the best advice on how to do a messy bun, whether your hair is long, short, or somewhere in the middle.
Table of Contents
- Why We Love the Messy Bun
- Getting Ready: What You'll Need
- The Classic Messy Bun: A Step-by-Step Walkthrough
- Messy Buns for Different Hair Types
- Expert Tips for Your Best Messy Bun
- Common Questions About Messy Buns
- Final Thoughts on Your Messy Bun Look
Why We Love the Messy Bun
The messy bun, as my text puts it, is truly "our mvp," meaning it's a very valuable player in the world of hair. It's a style that works for almost any situation, whether you're lounging at home or stepping out for a casual meet-up. This look just has a way of fitting in, so it’s pretty versatile.
One of the biggest reasons for its popularity is its speed, you know? My text talks about "the best 60 second messy bun tutorial," and that speed is a huge plus for busy mornings. You can get a stylish look in almost no time, which is really helpful when you're rushing out the door.
Also, this hairstyle is great for a wide range of hair types, which is something my text also points out. We've heard from stylists about how to do a messy bun, including many different tutorials for "long hair, short hair, and everything in between." It’s a truly adaptable style, fitting many different lengths and textures, so that's a big part of its appeal.
Getting Ready: What You'll Need
Before you start creating your perfect messy bun, it helps to have a few things close by, you know? You won't need a lot of special tools, which is part of what makes this style so appealing. Just a couple of basic items will usually do the trick, so it's quite simple.
You'll definitely want a good hair tie, perhaps a few, just in case. Some folks prefer the fabric ones that are gentle on hair, while others like a standard elastic. Bobby pins are also quite helpful, especially for holding stray pieces or adding a little extra security to your bun, so keep a handful ready.
For some, a wide-tooth comb or a brush might be useful to get rid of any major tangles before you begin. And if you want to add a bit of grip or volume, a texturizing spray or dry shampoo can be a nice touch, too. These extras are totally optional, but they can make a difference for your hair's texture, so consider them if you have them.
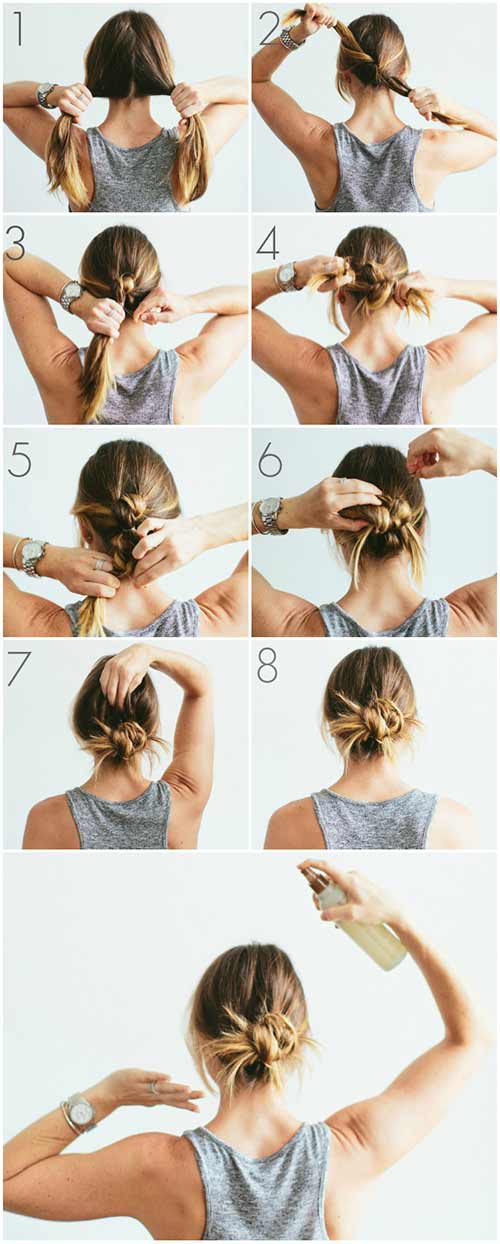
The Classic Messy Bun: A Step-by-Step Walkthrough
If you want to know how to do a messy bun, here, we take you through a step-by-step guide. This method will help you create a messy bun that looks just right, not too perfect, not too undone, so it's a good starting point for everyone. We've even had help from some professional hairstylists to put these steps together, which is pretty neat.
Gathering Your Hair
First things first, decide where you want your bun to sit. Some people like it high on the head, almost on the crown, while others prefer it lower, closer to the nape of the neck. This choice is really up to you and what feels comfortable, so play around with it a bit.
Once you've picked your spot, gather all your hair into a ponytail. Don't worry about making it super neat or smooth, because remember, we're going for a messy look here. A few loose strands around your face are totally fine, actually, and they add to the casual feel.
Hold your hair in one hand, ready for the next step. You're just setting the stage for the bun, so there's no need to overthink this part. It’s pretty much just getting your hair into position, you know?
The Twist and Wrap
Now, with your ponytail in hand, start twisting your hair. You can twist it somewhat loosely or a bit tighter, depending on how much "mess" you want in your bun. This twist forms the core of your bun, so it's an important part of the process.
Once twisted, begin wrapping that twisted hair around the base of your ponytail. You can wrap it in a circular motion, creating a coil shape. Don't worry if it's not perfectly round; that's part of the charm of a messy bun, so just let it happen naturally.
As you wrap, keep an eye on the shape forming. You're aiming for something that looks a little bit undone but still holds together. It's a bit of an art, really, finding that balance, but it gets easier with practice, too.
Securing Your Bun
After you've wrapped your hair into a bun shape, it's time to secure it. Take your hair tie and wrap it around the entire bun. You might need to wrap it once or twice, depending on how thick your hair is and how tight you want the bun to be, so experiment a little.
If you have any pieces that feel too loose or are sticking out in a way you don't like, that's where your bobby pins come in handy. Gently push them into the bun, catching those stray pieces and tucking them in. Don't use too many, though, as you still want that relaxed vibe, you know?
The goal here is to make sure your bun feels secure enough to stay put, but not so tight that it looks stiff. It should feel comfortable, so you can wear it all day without issues. This step is about stability, basically, for your new look.
Pulling for Perfection
This is the step where the "messy" truly comes to life. Once your bun is secured, gently tug at small sections of hair around the bun itself. Pull out a few strands from the top, sides, and bottom to create a softer, more relaxed outline. This makes it look less like a tight knot and more like a casual updo, so it's a key part.
You can also gently pull on the hair around your face, like near your temples or behind your ears, to create some soft face-framing pieces. This adds to the overall relaxed feel and can really soften your look. It's about letting a little bit of hair escape in a pretty way, you know?
Remember, the goal is not perfection. My text says, "No matter how you throw your messy bun together, the end." It’s about creating an effortless, lived-in look. Take a step back and look at it from different angles, making small adjustments until you're happy with how it appears, so just take your time.
Messy Buns for Different Hair Types
The beauty of the messy bun is that it works for almost everyone, which is something we've learned from stylists, too. Whether your hair is fine, thick, long, or short, there are ways to make this style work for you. It's pretty adaptable, you know?
Creating Volume for Thin Hair
If you have thin hair, you might worry about your messy bun looking a bit flat. But don't worry, my text mentions "three hacks that will help you create a voluminous messy bun for thin hair." One trick is to use a texturizing spray before you even start gathering your hair. This adds some grip and body, so your hair feels fuller.
Another helpful tip for thin hair is to create a slightly higher ponytail before twisting. This can give the illusion of more hair and a bigger bun. You might also try teasing the ponytail gently before wrapping it, which adds a lot of volume right where you need it, actually, making for a "cute messy bun for thin hair."
Some people with thinner hair find success by creating two smaller buns, one on top of the other, to give a fuller appearance. Or, you could try a half-up messy bun, which uses less hair and can still look quite stylish. It's all about finding what works for your hair's specific needs, so there are options.
Handling Long, Thick Hair
For those with long, thick hair, the challenge can be managing all that volume and making sure the bun stays put. You might find that a single hair tie isn't enough to hold everything securely. Using a stronger elastic or even two hair ties can be a good idea, you know?
When wrapping your hair, you might need to wrap it around the base more times than someone with thinner hair. Don't be afraid to use plenty of bobby pins to secure the ends and any larger sections that feel loose. It's about creating a solid foundation for your bun, basically.
You could also try braiding your ponytail loosely before wrapping it into a bun. This can help control the volume and create a nice textured look. It's a way to keep things contained while still getting that messy feel, so it's worth a try.
Short Hair Messy Bun Magic
Even with shorter hair, you can absolutely rock a messy bun! The key is often to aim for a half-up, half-down style, or a very high, small bun. You might not have enough length for a full, large bun, but a cute mini-bun can look just as charming, you know?
Gather the top section of your hair, from your temples up, as if you're making a half-ponytail. Then, follow the same twist and wrap steps as you would for a classic bun, just on a smaller scale. Lots of bobby pins will be your best friend here to secure those shorter pieces, actually.
Another approach for short hair is to create multiple small, messy buns, perhaps two on top of each other, or even three in a line. This can give a playful, textured look. It's about working with the hair you have and getting creative, so don't feel limited by length.
Expert Tips for Your Best Messy Bun
We asked stylists how to do a messy bun, and they shared some great insights, including tips from "three celebrity pro hairstylists." One common piece of advice is that day-old hair often works best for a messy bun. It has a bit more texture and grip than freshly washed hair, which can be a little too slippery, so consider that.
Don't be afraid to use a little dry shampoo or texturizing spray even if your hair isn't thin. These products add grip and volume, making it easier to shape and secure your bun. They can really help give that perfectly undone look, you know?
Placement matters, too. Try different heights for your bun to see what looks best on you. A high bun can feel playful, while a lower one can be more sophisticated. Experimenting is key to finding your favorite style, so try a few spots.
Also, remember that the "messy" part is about strategic loosening, not total chaos. Pull out just enough strands to soften the look, but not so many that the bun falls apart. It's a delicate balance, actually, that comes with a little practice.
For more general hair care advice and tips to keep your hair healthy and ready for any style, you might want to check out resources like this one: Hair Care Tips. Healthy hair is always easier to style, so that's a good thing to keep in mind.
Common Questions About Messy Buns
People often have questions about getting their messy bun just right. We've gathered some of the most common ones to help you out, you know? These are the kinds of things many people wonder about when trying this style, so you're not alone.
How do you make a messy bun stay?
To make your messy bun stay put, the right hair tie is important. Choose one that has good grip but isn't too tight. After wrapping the bun, use bobby pins to secure any loose sections or pieces that feel like they might slip out, so that's a good first step.
A light mist of hairspray can also help hold everything in place without making it stiff. Focus on spraying the bun itself and any flyaways around your face. It's about providing a little extra security without losing the messy feel, you know?
Also, starting with hair that isn't freshly washed can help, as it has more natural texture to hold the bun. This makes it easier for the hair to grip onto itself and the hair tie, so that's a handy tip.
What makes a messy bun messy?
What makes a messy bun messy is that intentional, slightly undone look. It's about letting a few strands escape, having a bit of texture, and not aiming for perfect smoothness. It's not about being truly untidy, but rather looking effortlessly styled, you know?
The "mess" comes from gently pulling out small sections of hair from the bun itself and around your hairline after it's secured. This creates softness and an airy feel, rather than a tight, sleek knot. It gives it that casual, relaxed vibe, so that's key.
Sometimes, using your fingers instead of a brush to gather your hair can also contribute to the messy look, as it prevents it from being too neat. It’s all about creating a natural, lived-in feel, actually, which is why it's so popular.
Is a messy bun good for thin hair?
Yes, a messy bun can be very good for thin hair! My text specifically mentions "three hacks that will help you create a voluminous messy bun for thin hair" and even talks about a "cute messy bun for thin hair." The trick is to add volume and texture before and during the styling process, you know?
Using products like dry shampoo or volumizing spray can make thin hair feel thicker and give it more grip. Teasing the ponytail before wrapping it into a bun also adds a lot of fullness, making the bun appear larger. It's about creating the illusion of more hair, so it definitely works.
Also, opting for a higher bun can make thin hair look fuller, as it draws attention upwards and creates a more prominent shape. With the right techniques, a messy bun can be a fantastic style choice for those with finer hair, so don't hesitate to try it.
Final Thoughts on Your Messy Bun Look
The messy bun truly is a fantastic hairstyle, offering both ease and a great look. As my text suggests, this method will help you create a messy bun that you'll love, no matter your hair type. It’s a style that keeps on giving, providing a quick fix for any day.
So, give these steps a try and make the messy bun your own. It's a style that invites personal touches, so have fun with it. You can learn more about hair styling options on our site, and perhaps even find more inspiration by visiting our other hair tutorials for new ideas.

Detail Author:
- Name : Dorthy Crooks
- Username : nathanael26
- Email : melyssa.yost@leuschke.com
- Birthdate : 1990-05-08
- Address : 5592 Ashly Island Suite 746 New Alexischester, GA 84902-7645
- Phone : 1-726-791-3775
- Company : Ondricka-Jacobi
- Job : Segmental Paver
- Bio : Fugit nisi et asperiores quidem sed maxime. Et laboriosam rem tempore ea voluptatem voluptatem. Officiis atque maxime non temporibus ullam.
Socials
instagram:
- url : https://instagram.com/jayme_real
- username : jayme_real
- bio : Asperiores consequuntur et quos deserunt accusantium. Est quasi blanditiis non et doloremque.
- followers : 1137
- following : 1565
facebook:
- url : https://facebook.com/jayme_goodwin
- username : jayme_goodwin
- bio : Quia eos sint odit. Dolor ut soluta minus doloremque mollitia et voluptatem.
- followers : 3275
- following : 233
tiktok:
- url : https://tiktok.com/@jayme_goodwin
- username : jayme_goodwin
- bio : Ea sit vitae minima quidem ipsum similique consectetur.
- followers : 103
- following : 888


 Bonus
Bonus